> ## Documentation Index
> Fetch the complete documentation index at: https://help.voxdash.com/llms.txt
> Use this file to discover all available pages before exploring further.
# What Is an Organization – Data Panel User?
> In VoxDash, every user who signs up is automatically assigned to a private organization. This organization acts as the central workspace where all your data…
In **VoxDash**, every user who signs up is automatically assigned to a private **organization**. This organization acts as the central workspace where all your data, settings, and team management tools are located.
When a new user registers on the VoxDash platform, the system immediately creates a dedicated organization for that user. This organization is private by default, meaning only the creator initially has access to it.
All data uploaded by the user, such as analytics reports, e-commerce datasets, or other structured information, will be stored within this organization. This ensures that your data is securely isolated from other users unless explicitly shared.
**Important Note:** Each organization has its own data, users, and SaaS plan; the owner can create different organizations to manage everything better. Later, the owner can **switch** between organizations via the header.
## **Key Features of an Organization in the Data Provider Panel**
### Data Management
Within the **Data Provider Panel**, you can:
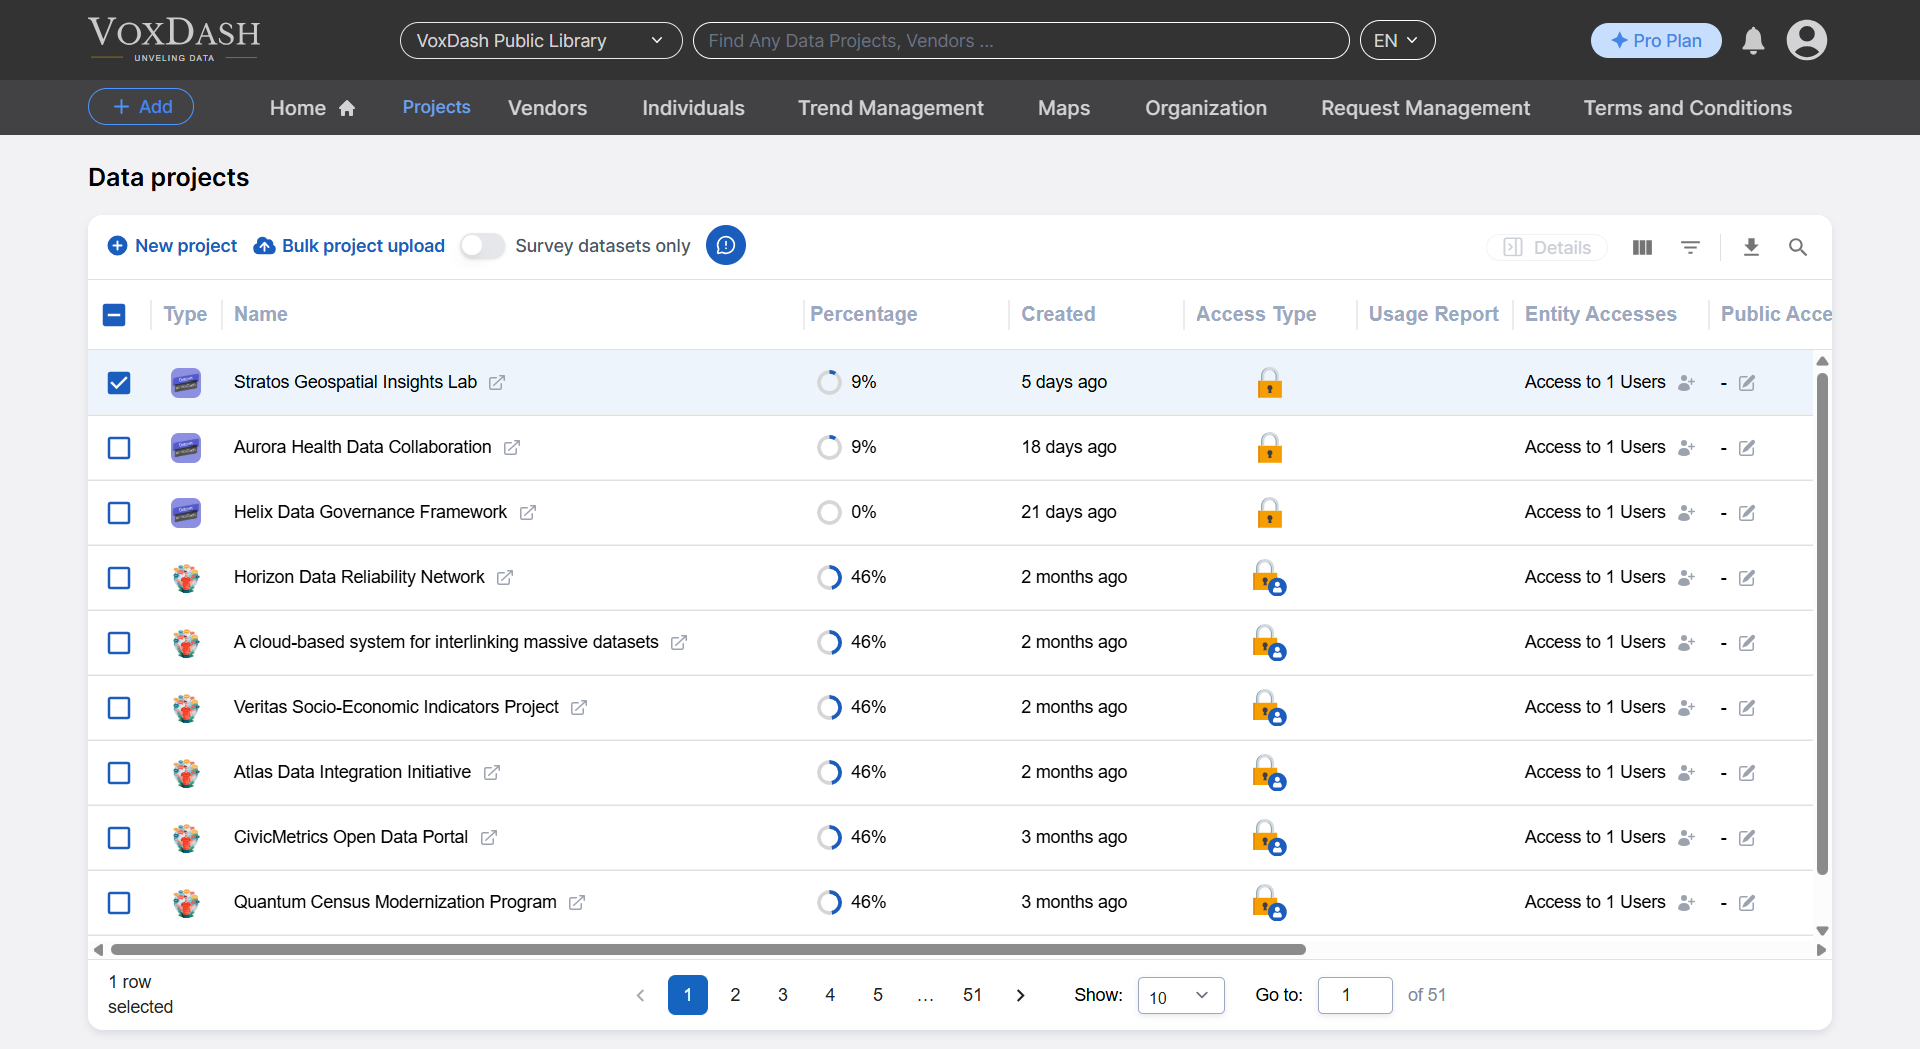
* View all uploaded [Data Projects](https://dataprovider.voxdash.com/projects)
* Edit or update existing data entries
* Delete data that is no longer needed
* Track upload history and status
* Add related [vendor](/Vendors-&-Individuals/Add-A-New-Vendor) or [individual](/Vendors-&-Individuals/Add-A-New-Individual)
* Create [trends](Data-Projects/Trend-Analysis) from the uploaded data
* Create and manage [geographical Maps](Maps-&-Visualizations/Map-Overview)
**Note:** This panel serves as your main interface for managing any analytics or ecommerce-related data you bring into VoxDash.
[Everything You Need to Know About the Data Provider Panel](/Data-Management)
 ### User & Team Management
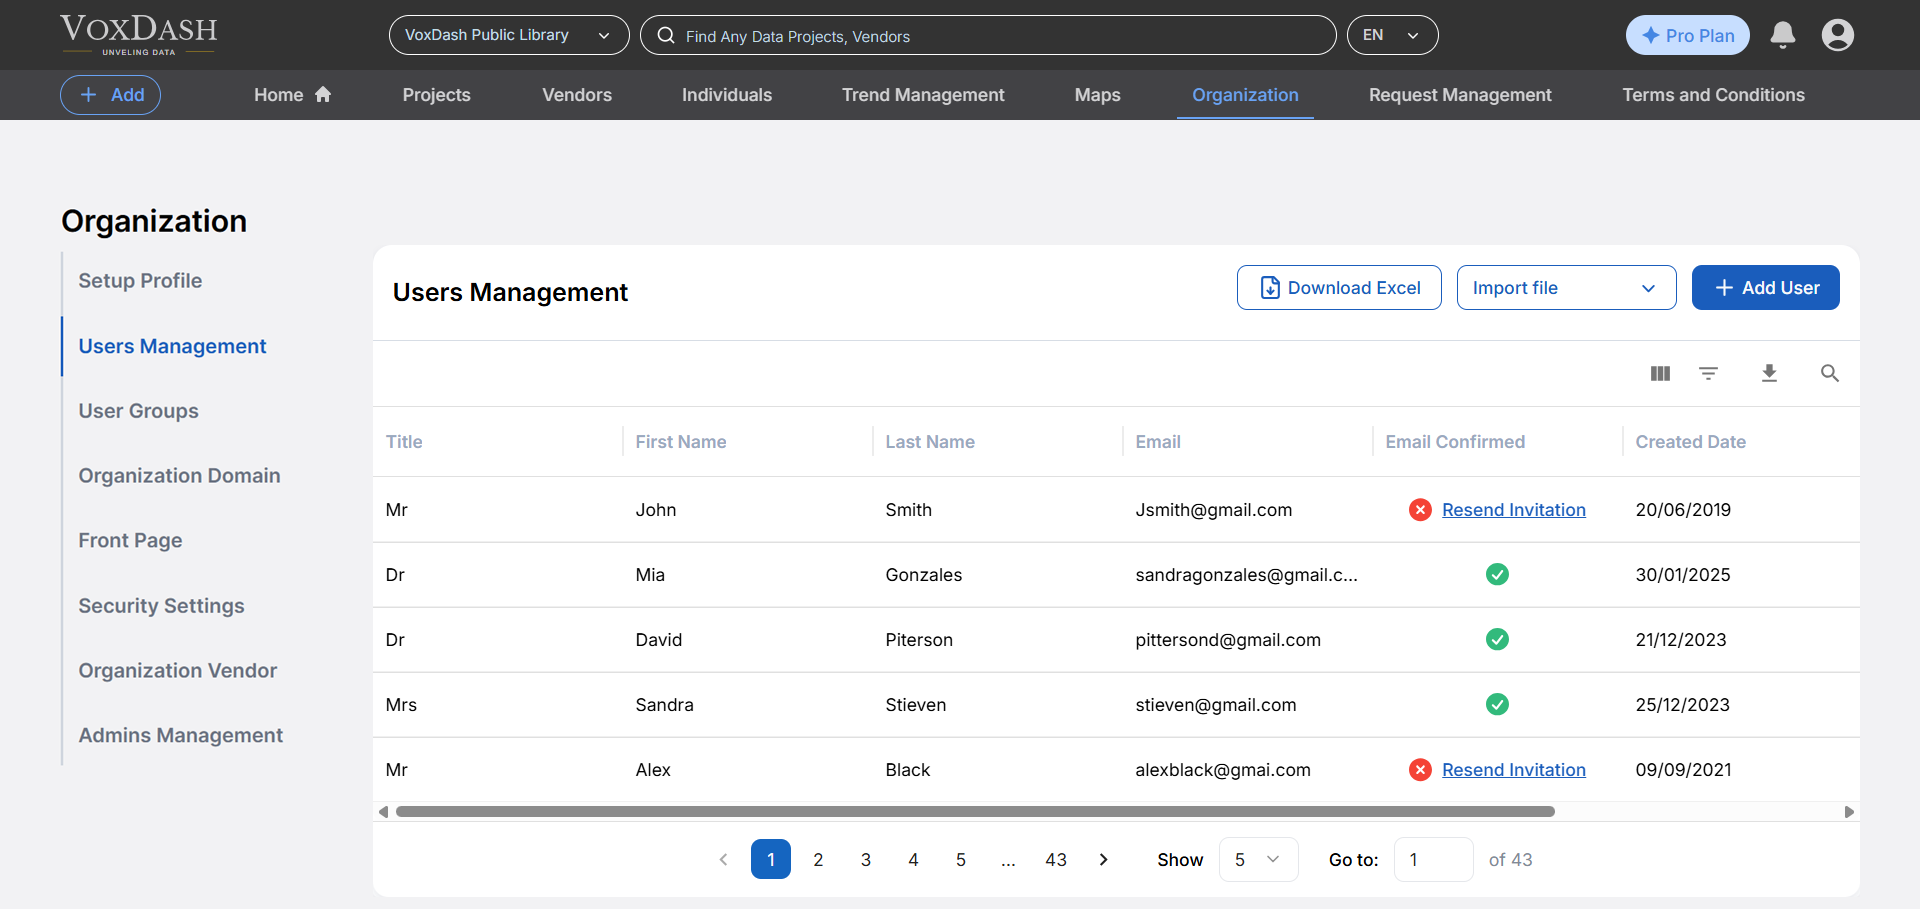
In the **Organization Settings Tab**, you can perform several administrative tasks, including:
* **Set up your organization profile:** Define the organization name, logo, and description.
* **Manage users:** Invite new users by email, assign roles, or remove users.
* **Create user groups:** Organize users into logical teams or departments for easier permission control.
### User & Team Management
In the **Organization Settings Tab**, you can perform several administrative tasks, including:
* **Set up your organization profile:** Define the organization name, logo, and description.
* **Manage users:** Invite new users by email, assign roles, or remove users.
* **Create user groups:** Organize users into logical teams or departments for easier permission control.
 * **Assign admins:** Grant administrative privileges to trusted members who can help manage the organization.
**Tips:**
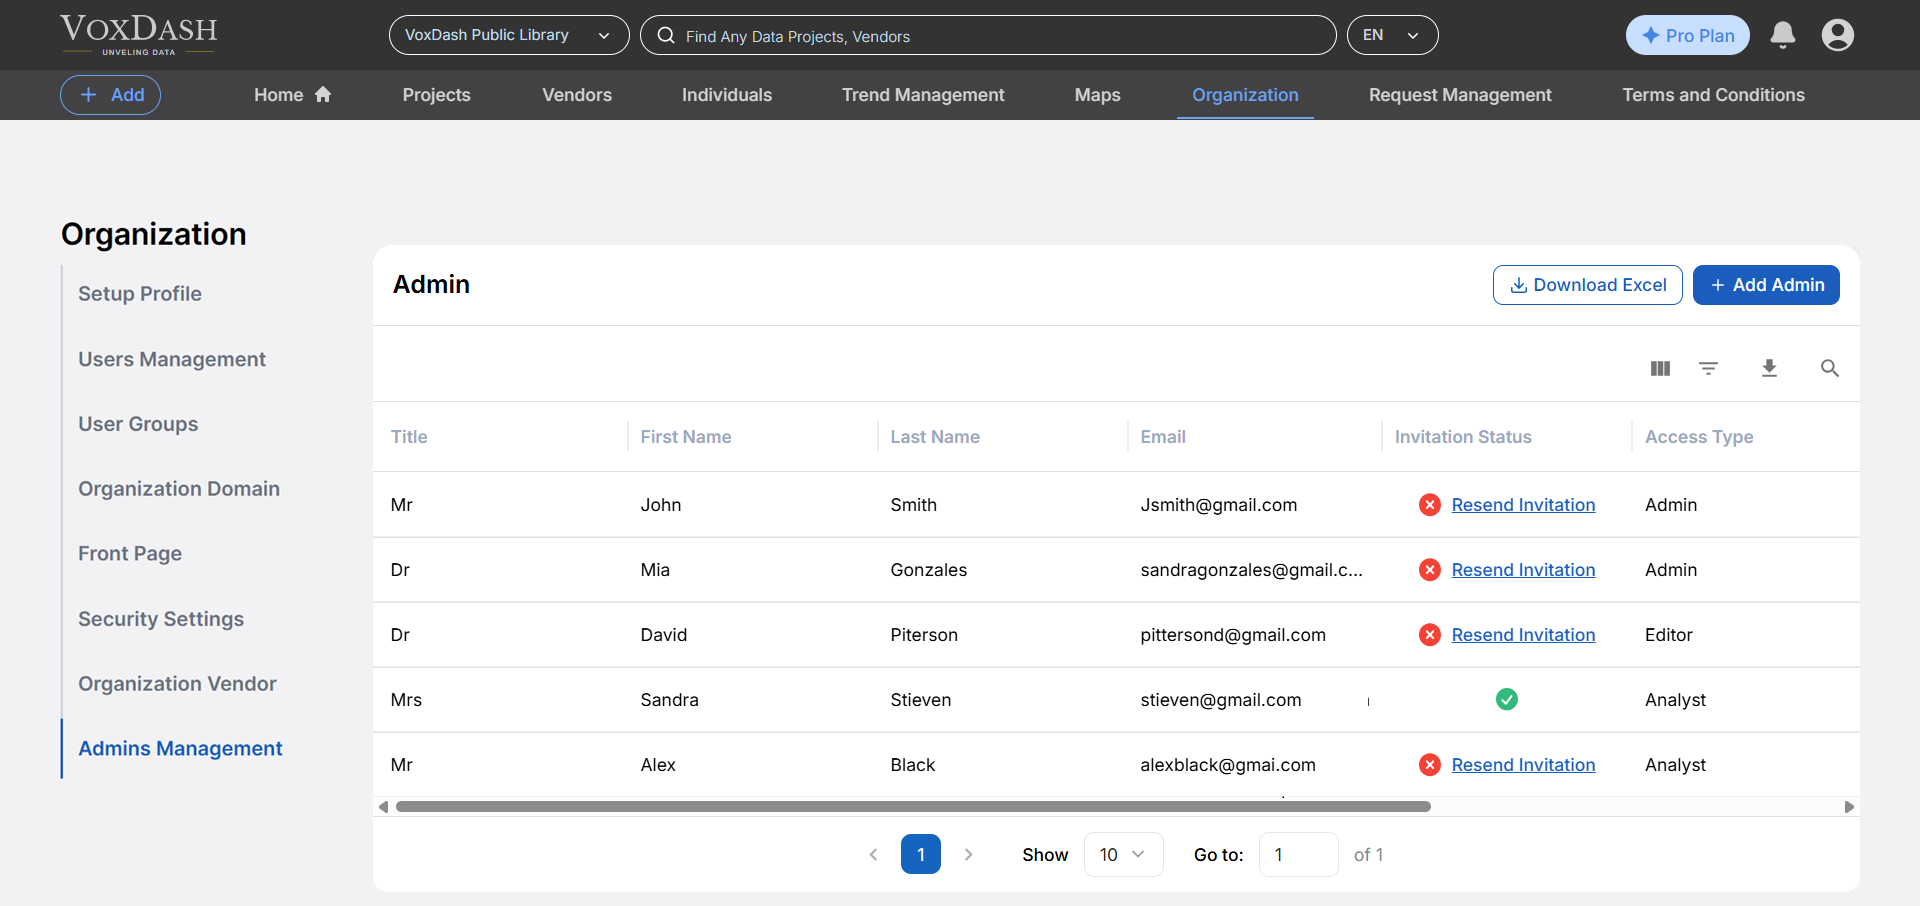
* The [Admin Management](https://help.voxdash.com/User-Management/Admin-Management) page allows organizations to assign employees to different administrative roles within their VoxDash account.
* **User Access:** Each user can be a member of one or more organizations. Access to an organization depends on your user permissions, which are typically granted by an admin.
* **Roles and Permissions:** A user may have different roles in different organizations *(e.g., Admin in Organization A, Analyst in Organization B).* These roles define what actions you can perform, such as viewing reports, managing data sources, or editing configurations.
* **Assign admins:** Grant administrative privileges to trusted members who can help manage the organization.
**Tips:**
* The [Admin Management](https://help.voxdash.com/User-Management/Admin-Management) page allows organizations to assign employees to different administrative roles within their VoxDash account.
* **User Access:** Each user can be a member of one or more organizations. Access to an organization depends on your user permissions, which are typically granted by an admin.
* **Roles and Permissions:** A user may have different roles in different organizations *(e.g., Admin in Organization A, Analyst in Organization B).* These roles define what actions you can perform, such as viewing reports, managing data sources, or editing configurations.
 [Everything You Need to Know About **Team Management**](/Team-management)
### Homepage Customization
You can personalize the landing experience for users in your organization by editing the [homepage setup](https://help.voxdash.com/Organization-Setup/Organization-Home-Page-Setup). This includes configuring widgets, charts, or reports that appear by default when users log in.
### Security Settings
[Security](https://help.voxdash.com/Access-Controls/Security-&-Permissions) is a core part of organizational management. You can:
* Set password policies
* Enable two-factor authentication (2FA)
* Control session timeouts
* Manage access levels and data sharing permissions
### Organization Settings
In VoxDash, users can [connect a vendor to an organization](https://help.voxdash.com/Organization-Setup/Add-Vendor-to-Organization). This allows for better collaboration, data management, and role assignment across surveys and analytics workflows.
### Setup Profile
When users sign up for VoxDash, a [personal profile page](https://help.voxdash.com/Vendors-&-Individuals/User-Profile-Page) is automatically created. This profile serves as a central place to manage personal details, showcase professional background, and contribute to the platform’s collaborative data environment.
## **How to Select or Add an Organization**
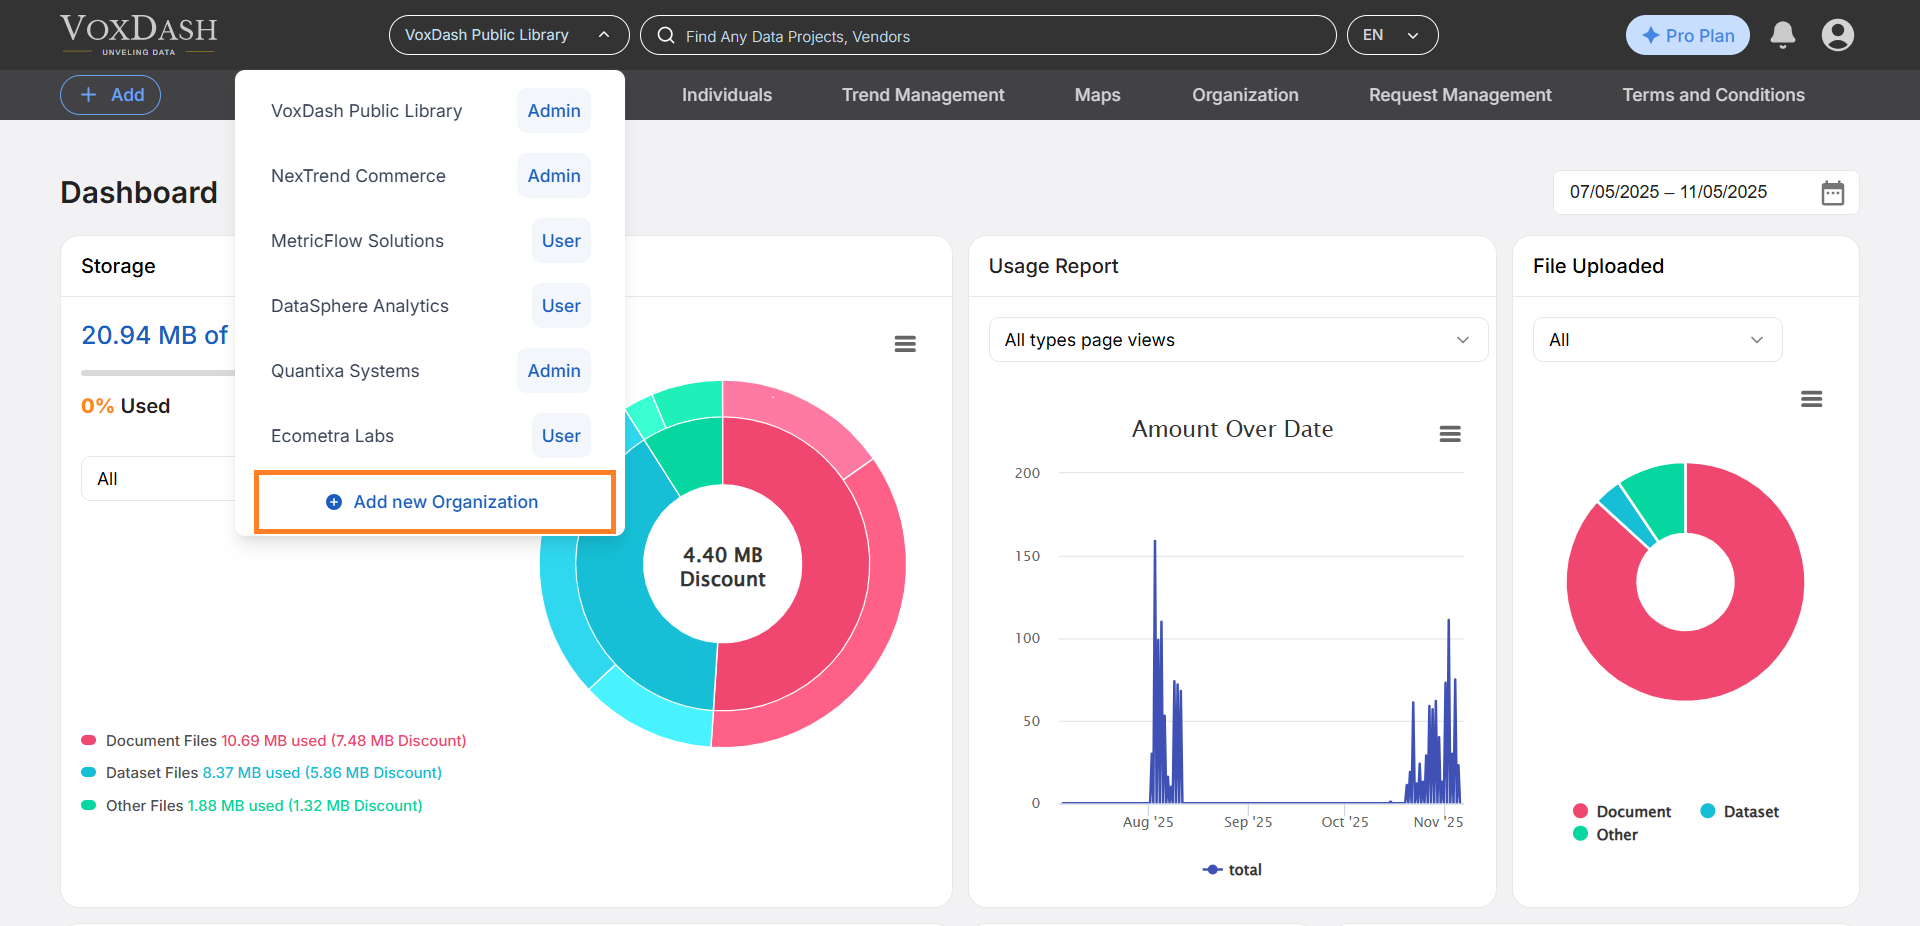
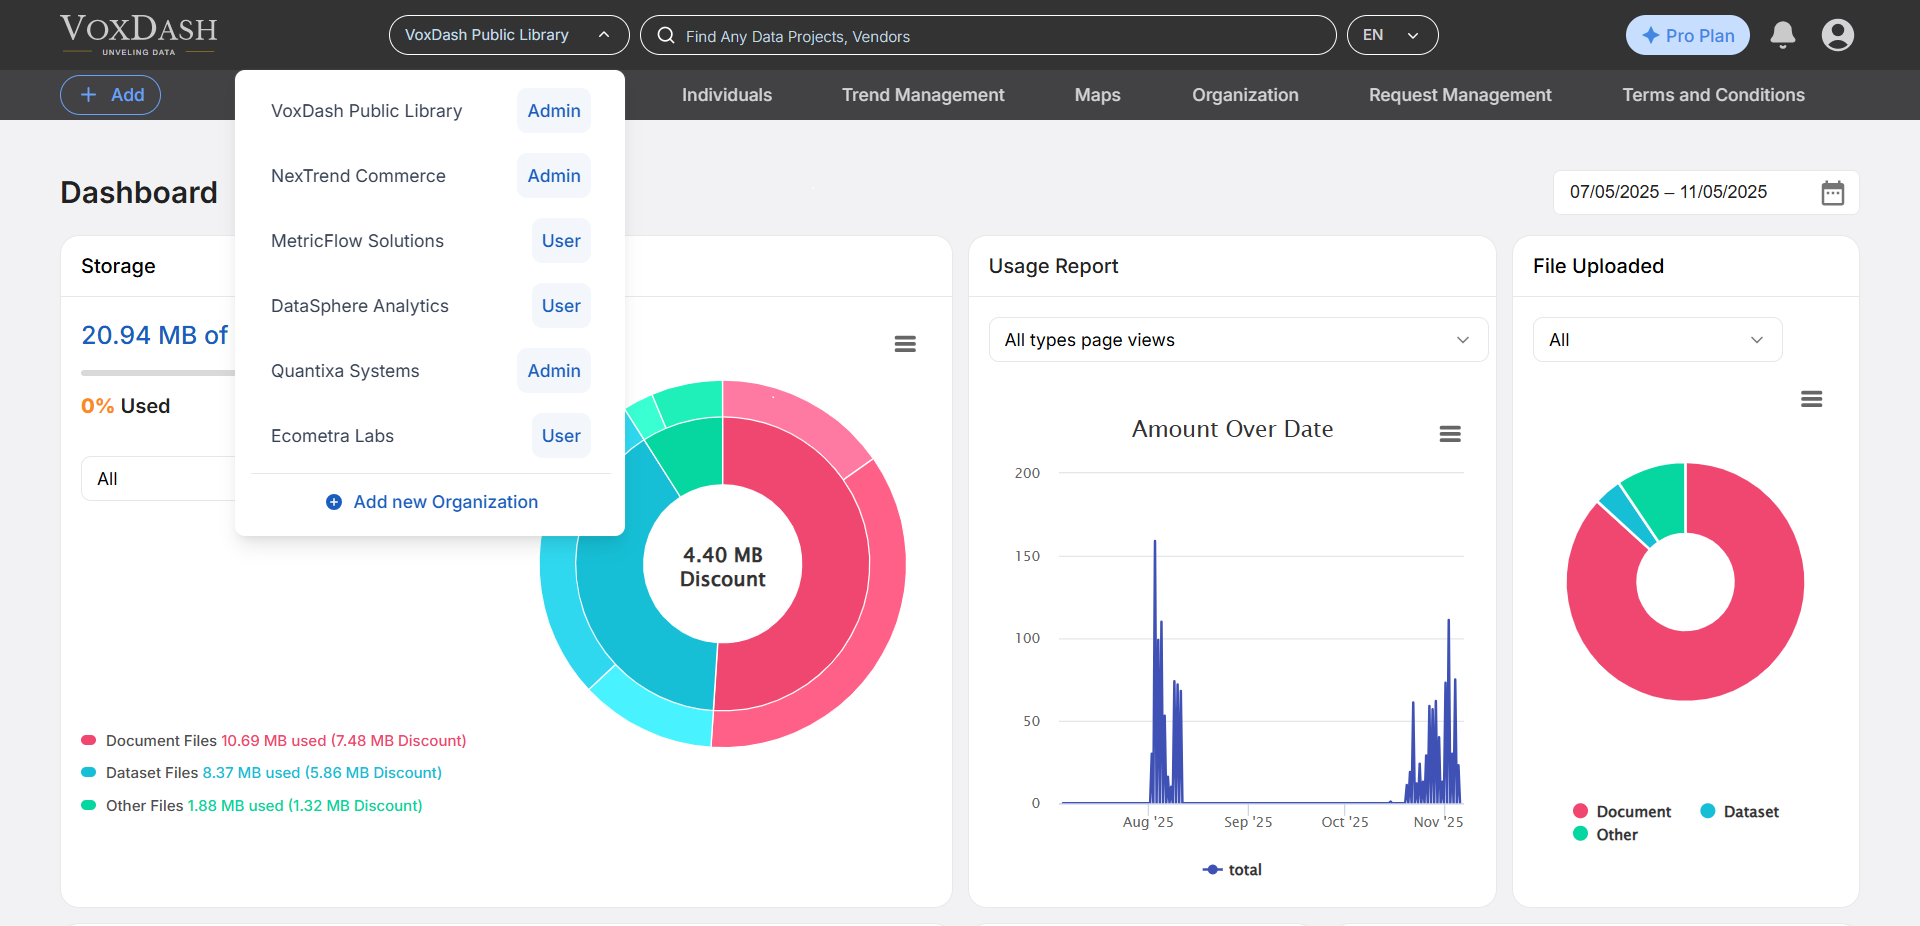
1. **Locate the Header Menu:** At the top of the website, you will see a dropdown or clickable menu labeled with the current organization name.
2. **Click to Expand the Menu:** Click the organization name to open the list of organizations available to your account.
3. **Choose an Organization:** Select the desired organization from the list. Once selected, VoxDash will load data and dashboards specific to that organization.
4. **Add New Organization:** Click on the **Add new organization** to create another organization based on your needs. You can use your main email or other verified emails.
[Everything You Need to Know About **Team Management**](/Team-management)
### Homepage Customization
You can personalize the landing experience for users in your organization by editing the [homepage setup](https://help.voxdash.com/Organization-Setup/Organization-Home-Page-Setup). This includes configuring widgets, charts, or reports that appear by default when users log in.
### Security Settings
[Security](https://help.voxdash.com/Access-Controls/Security-&-Permissions) is a core part of organizational management. You can:
* Set password policies
* Enable two-factor authentication (2FA)
* Control session timeouts
* Manage access levels and data sharing permissions
### Organization Settings
In VoxDash, users can [connect a vendor to an organization](https://help.voxdash.com/Organization-Setup/Add-Vendor-to-Organization). This allows for better collaboration, data management, and role assignment across surveys and analytics workflows.
### Setup Profile
When users sign up for VoxDash, a [personal profile page](https://help.voxdash.com/Vendors-&-Individuals/User-Profile-Page) is automatically created. This profile serves as a central place to manage personal details, showcase professional background, and contribute to the platform’s collaborative data environment.
## **How to Select or Add an Organization**
1. **Locate the Header Menu:** At the top of the website, you will see a dropdown or clickable menu labeled with the current organization name.
2. **Click to Expand the Menu:** Click the organization name to open the list of organizations available to your account.
3. **Choose an Organization:** Select the desired organization from the list. Once selected, VoxDash will load data and dashboards specific to that organization.
4. **Add New Organization:** Click on the **Add new organization** to create another organization based on your needs. You can use your main email or other verified emails.
 ## **Adding a New Organization**
Users with the appropriate permissions can add a new organization to the system. This is useful when:
* Your team manages analytics for multiple businesses or clients.
* You want to separate environments or departments into distinct data spaces.
* You want to separate your users
### How to Add a New Organization?
* 1. At the top of the website, you will see a dropdown or clickable menu labeled with the current organization name.
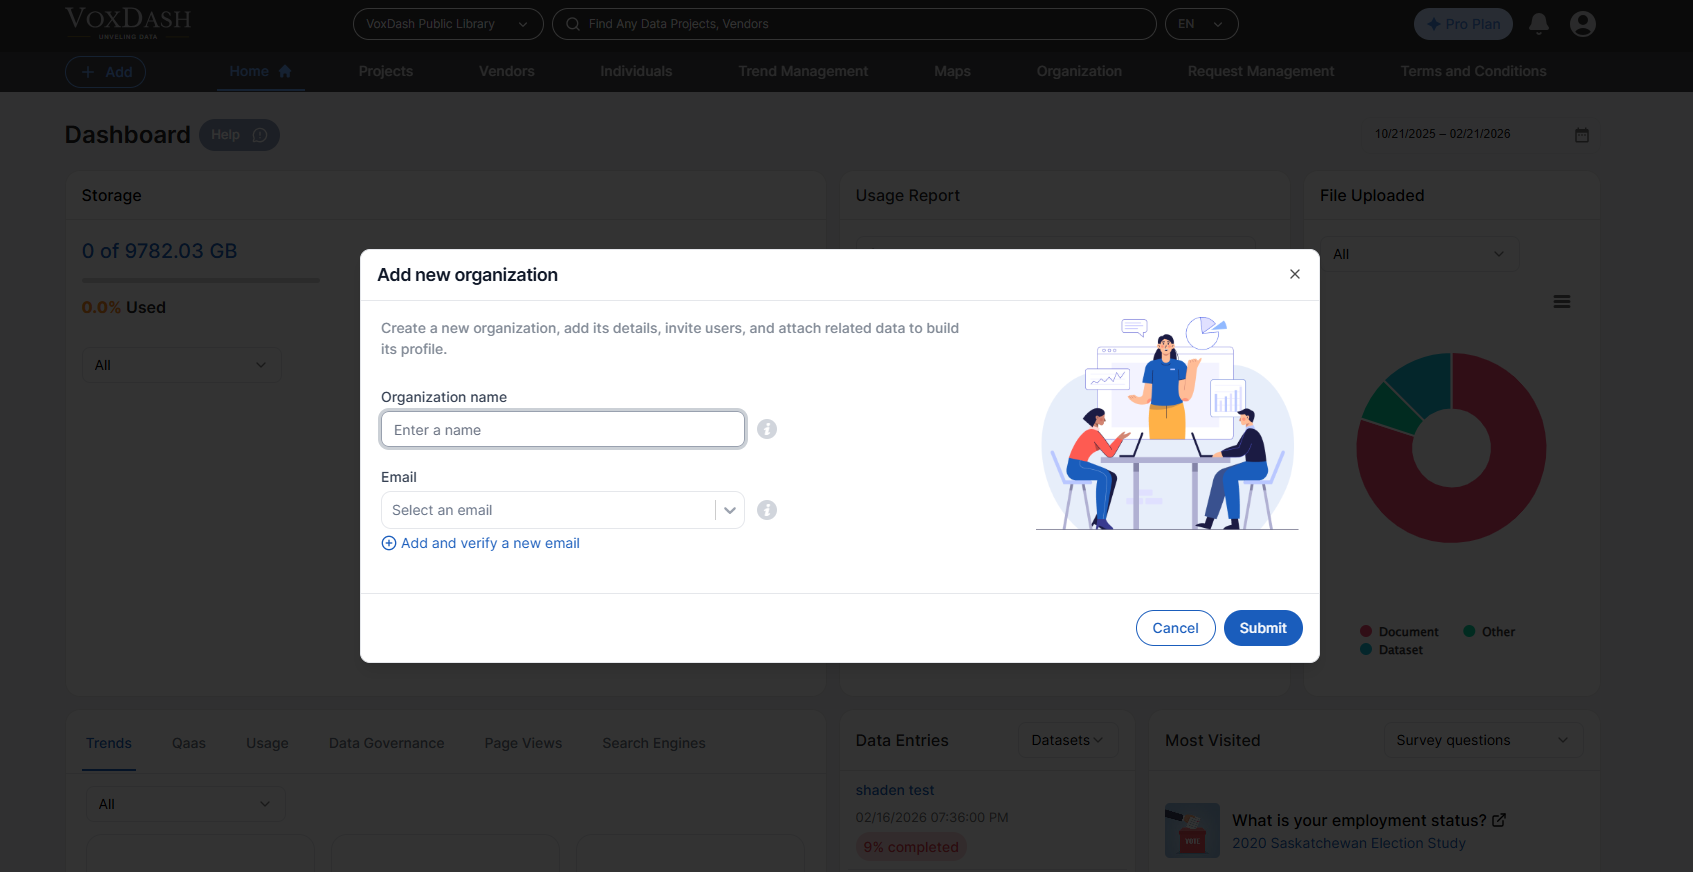
* 2. Click on the **Add new organization** to create another organization based on your needs.
* 3. Add proper name for your organization and add an email to it.
**Note:** You can use your main email or other verified emails.
## **Adding a New Organization**
Users with the appropriate permissions can add a new organization to the system. This is useful when:
* Your team manages analytics for multiple businesses or clients.
* You want to separate environments or departments into distinct data spaces.
* You want to separate your users
### How to Add a New Organization?
* 1. At the top of the website, you will see a dropdown or clickable menu labeled with the current organization name.
* 2. Click on the **Add new organization** to create another organization based on your needs.
* 3. Add proper name for your organization and add an email to it.
**Note:** You can use your main email or other verified emails.