> ## Documentation Index
> Fetch the complete documentation index at: https://help.voxdash.com/llms.txt
> Use this file to discover all available pages before exploring further.
# Survey Data Entry Guide
> This tutorial will guide you through the steps to complete data entry for Survey files in our SaaS application. Follow the instructions carefully to ensure…
This tutorial will guide you through the steps to complete data entry for Survey files in our SaaS application. Follow the instructions carefully to ensure accurate and comprehensive documentation of your data.
## **Steps to Start Data Entry**
1. **Locate the Survey File**
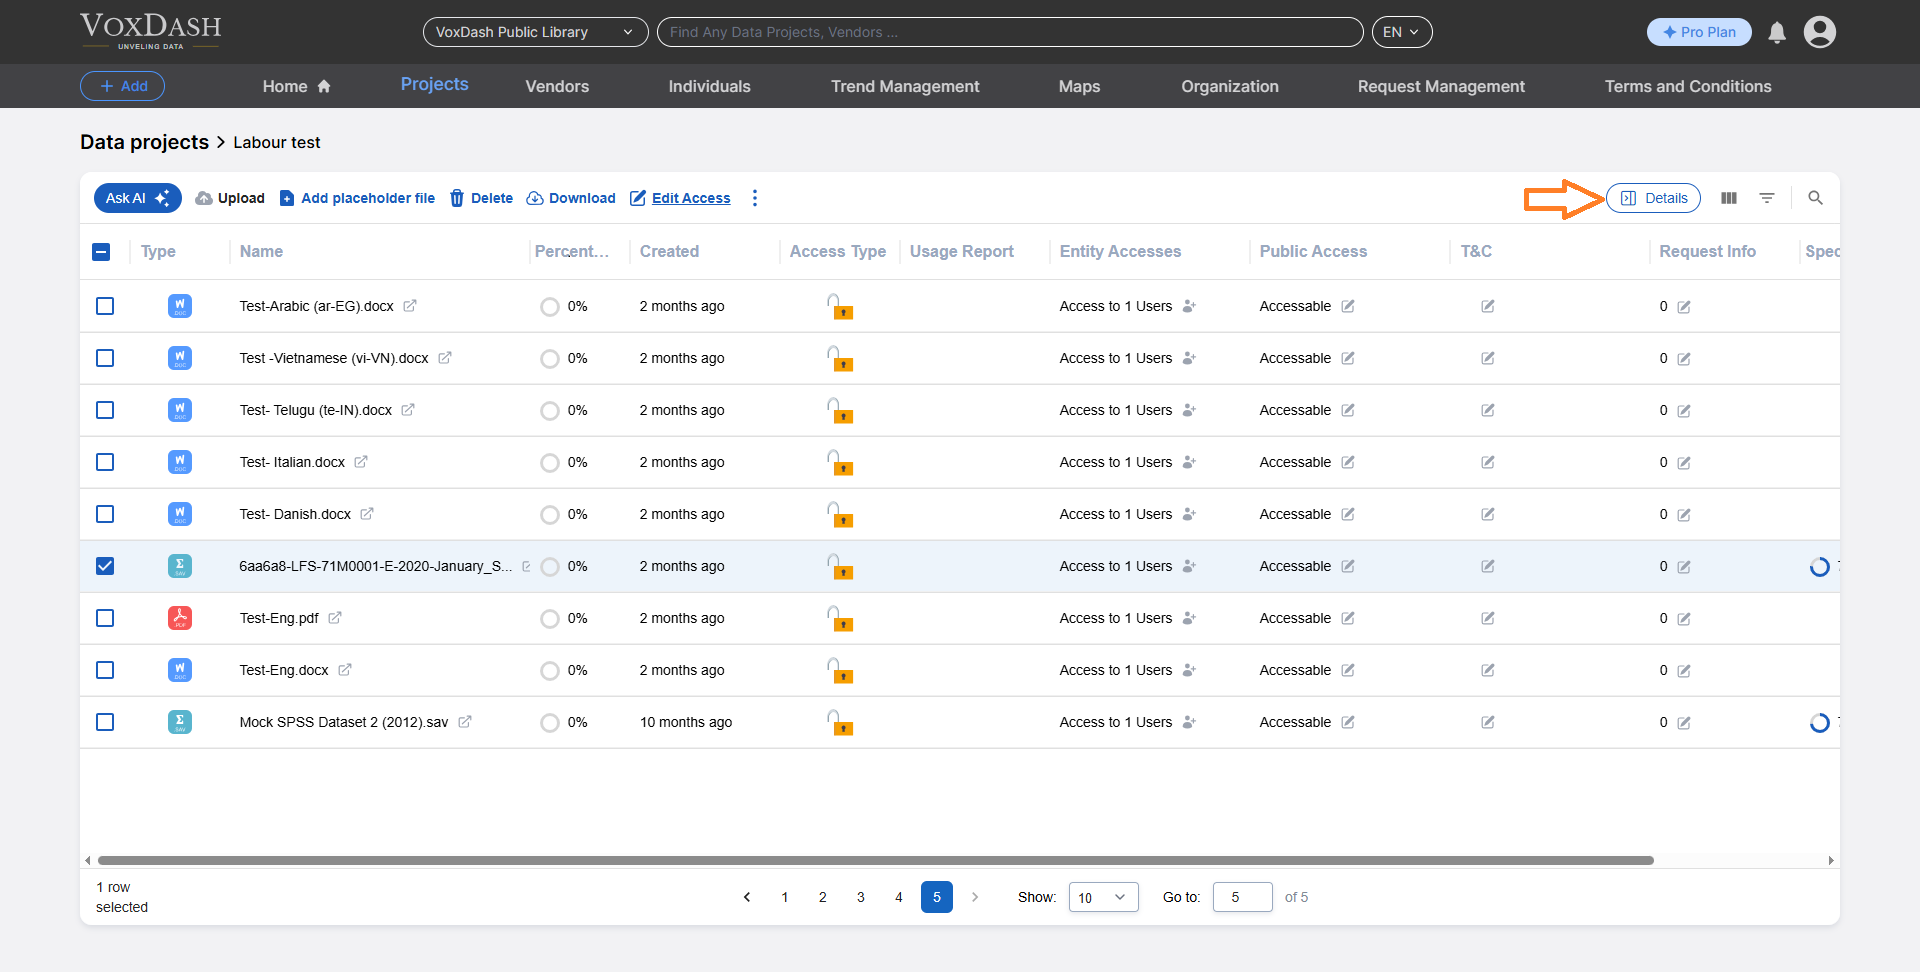
Navigate to the [File Manager Table](https://dataprovider.voxdash.com/projects) in data provider then find your data project to proceed with Survey file data entry.
2. **Access Data Entry**
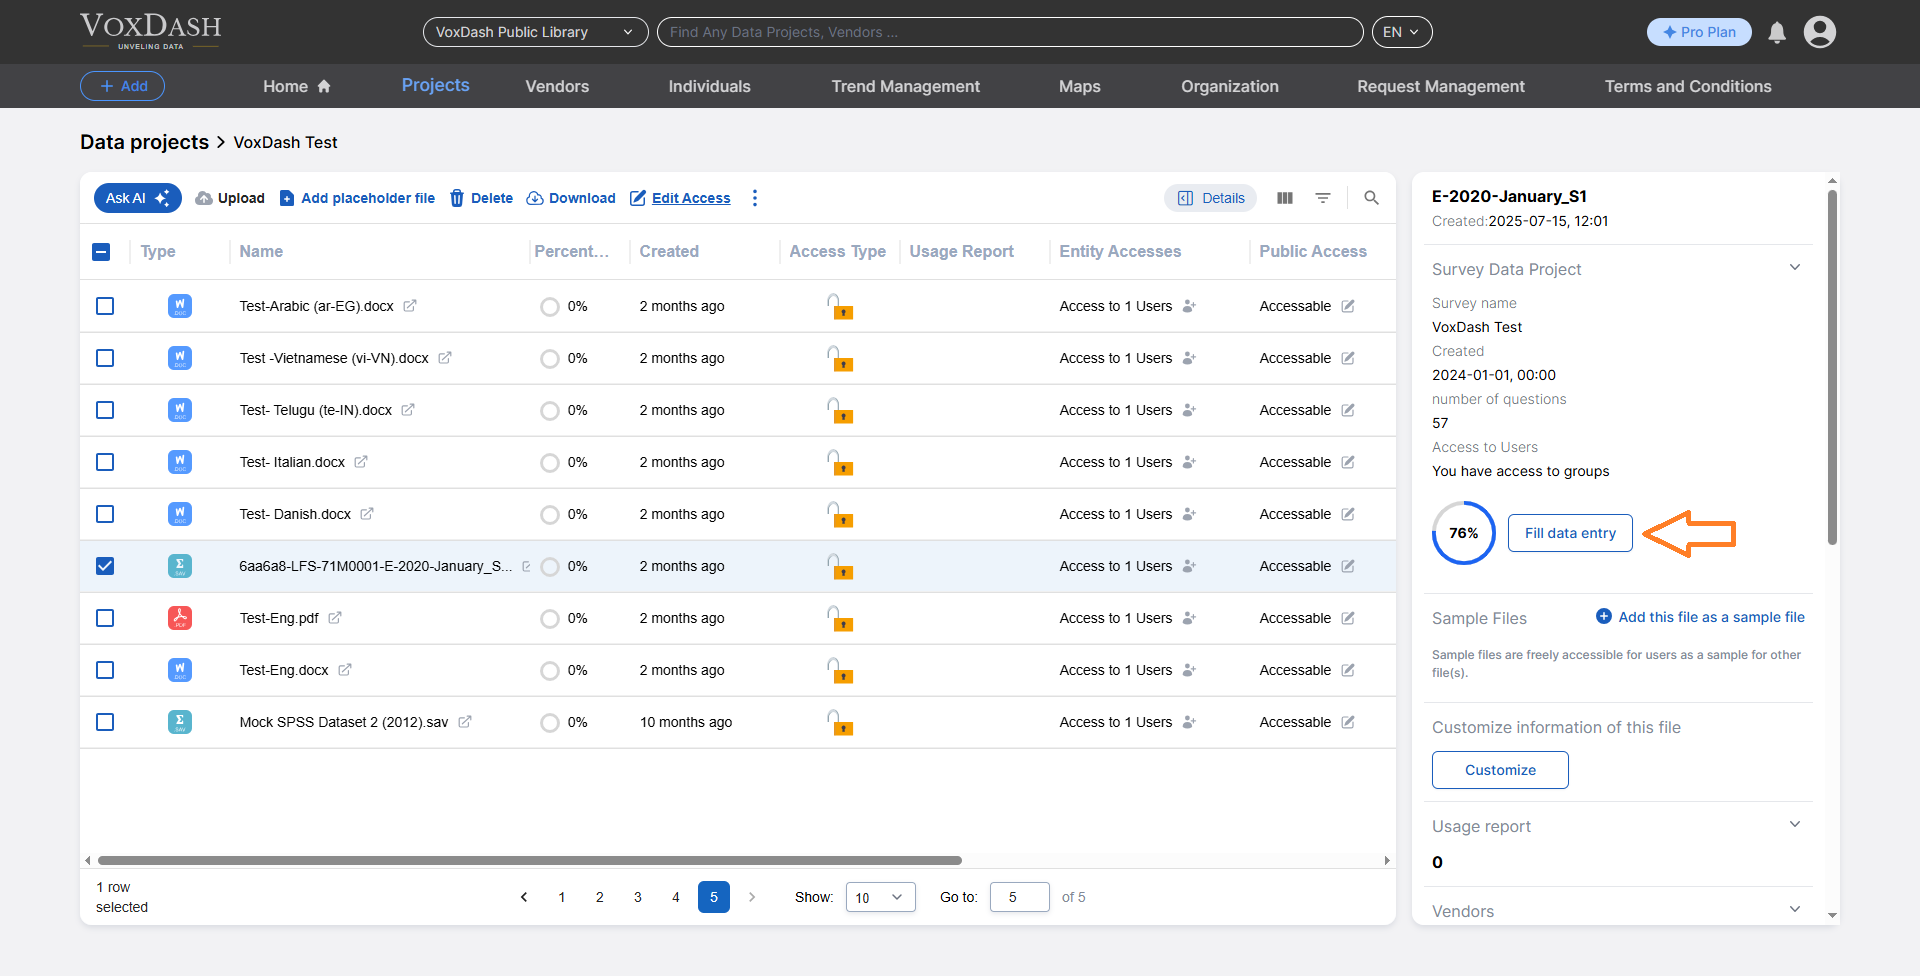
Click the **Fill data entry** button located in the bottom-right corner of the sidebar.
 ### After Clicking **Fill data entry**
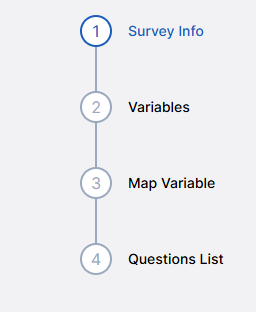
Once you click the button, a new page will appear featuring **four wizards** tailored for Survey-specific data entry. These sections include:
1. **Survey Info**: Document how the data sample was collected.
2. **Variables**: Define and describe all variables present in the dataset.
3. **Maps**: Attach relevant maps or spatial data (if applicable).
4. **Questions List**: Provide a list of the questions used to collect the dataset.
Complete each wizard thoroughly to ensure your dataset is well-documented and ready for analysis.
Learn more about each wizard [here](/Data-Entry-Fields/Survey-Data-Entry-Fields)
### After Clicking **Fill data entry**
Once you click the button, a new page will appear featuring **four wizards** tailored for Survey-specific data entry. These sections include:
1. **Survey Info**: Document how the data sample was collected.
2. **Variables**: Define and describe all variables present in the dataset.
3. **Maps**: Attach relevant maps or spatial data (if applicable).
4. **Questions List**: Provide a list of the questions used to collect the dataset.
Complete each wizard thoroughly to ensure your dataset is well-documented and ready for analysis.
Learn more about each wizard [here](/Data-Entry-Fields/Survey-Data-Entry-Fields)
 ## **4 Wizards Introduction**
### 1. **Survey Info**
## **4 Wizards Introduction**
### 1. **Survey Info**
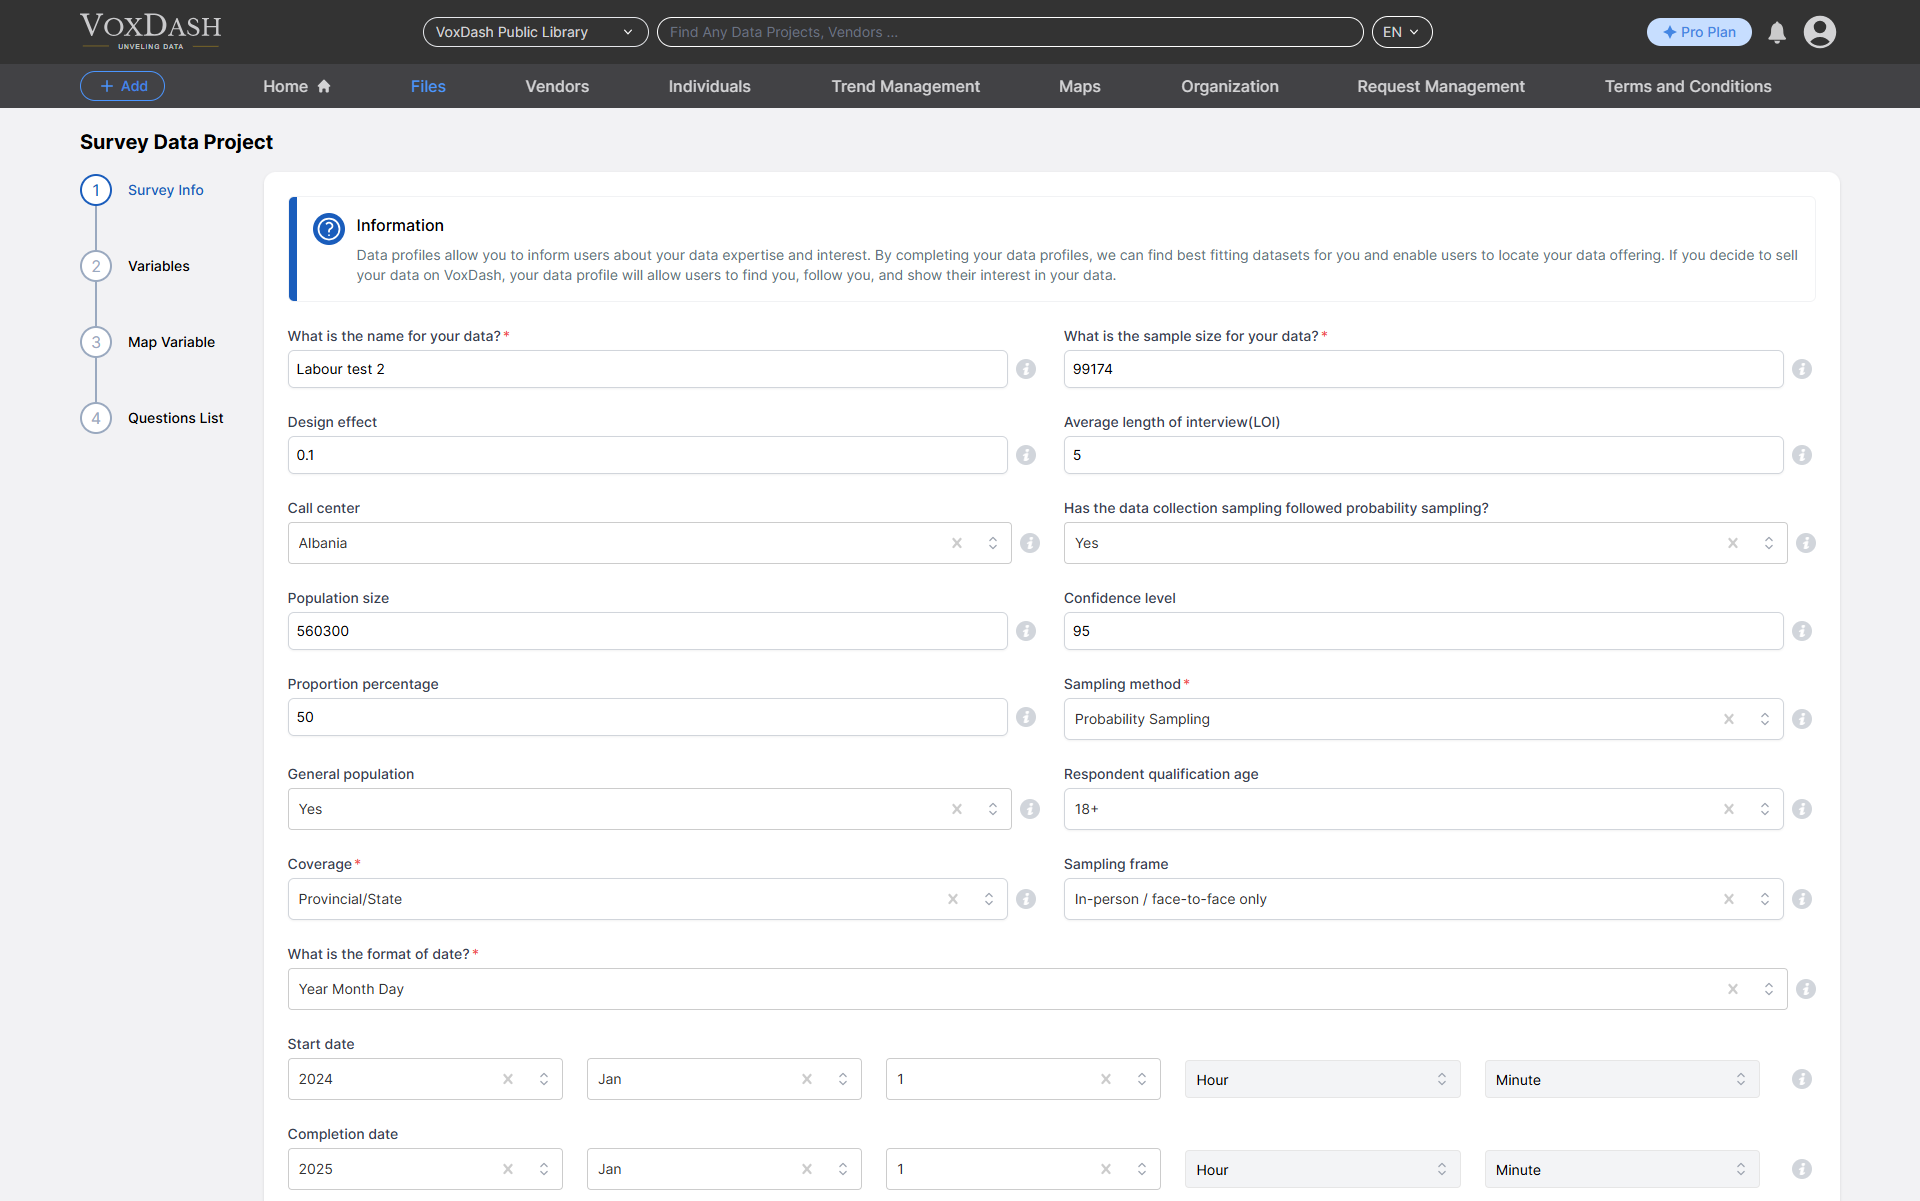
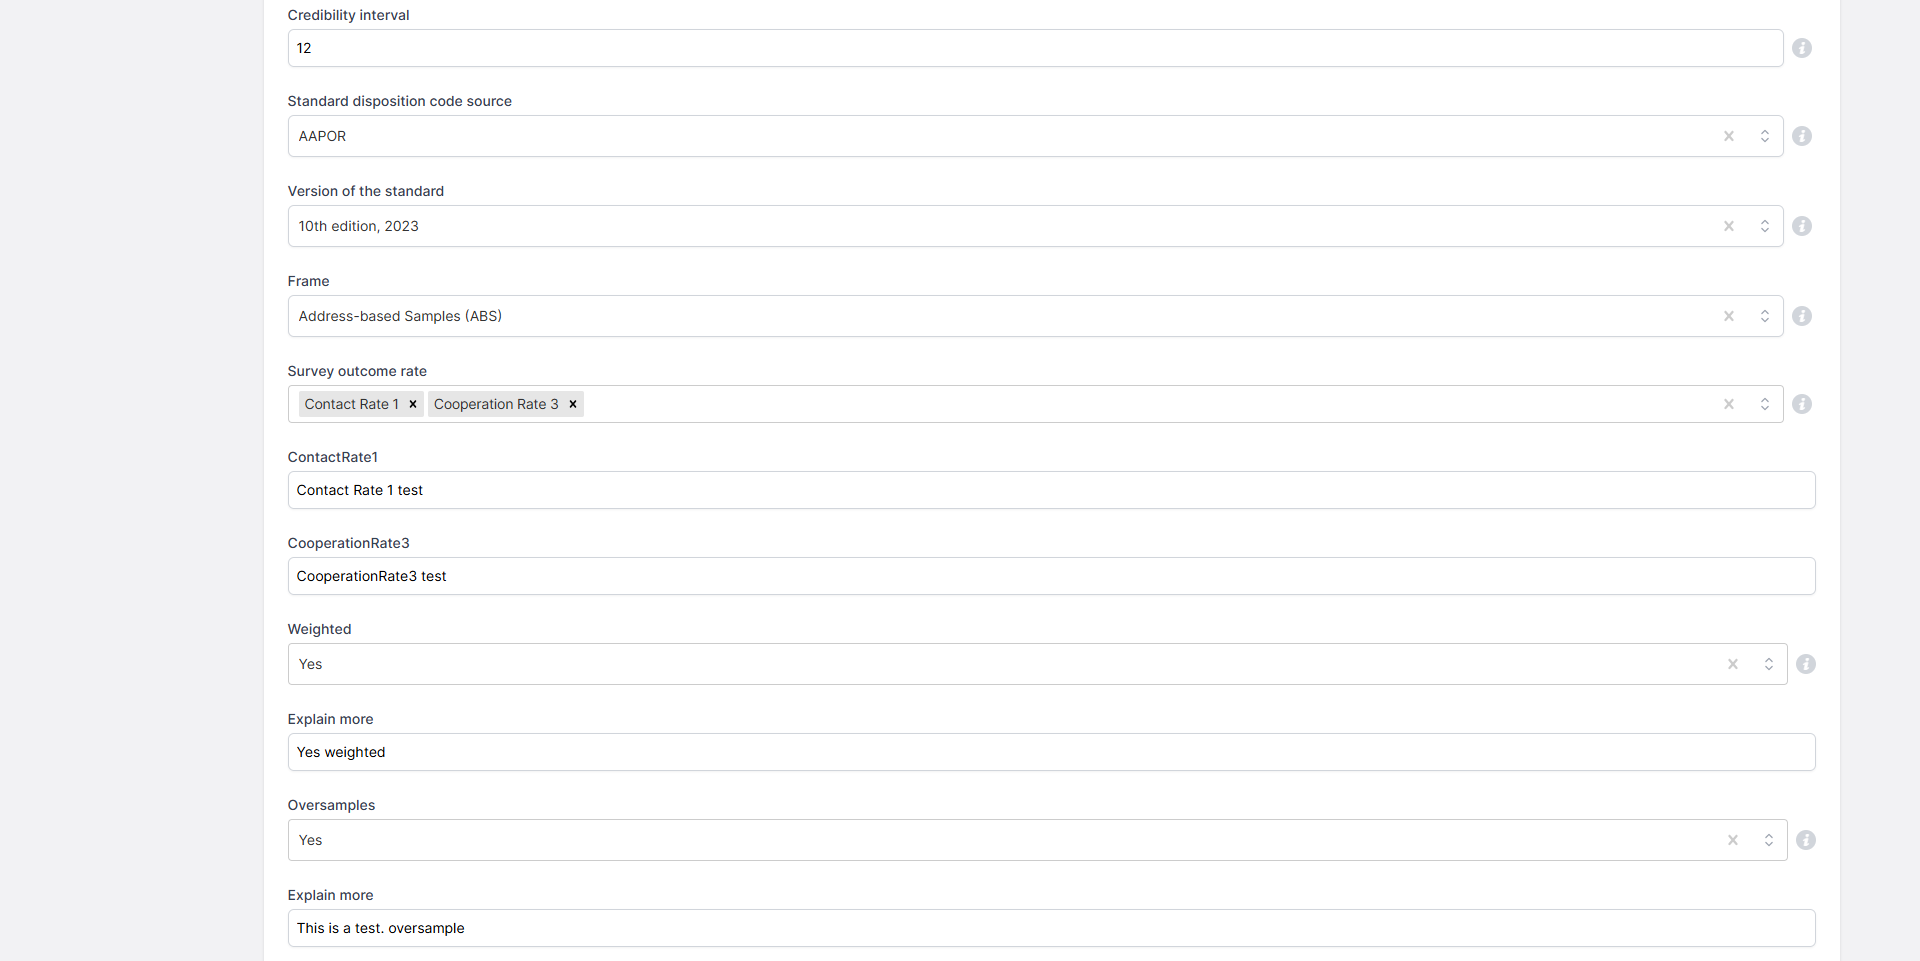
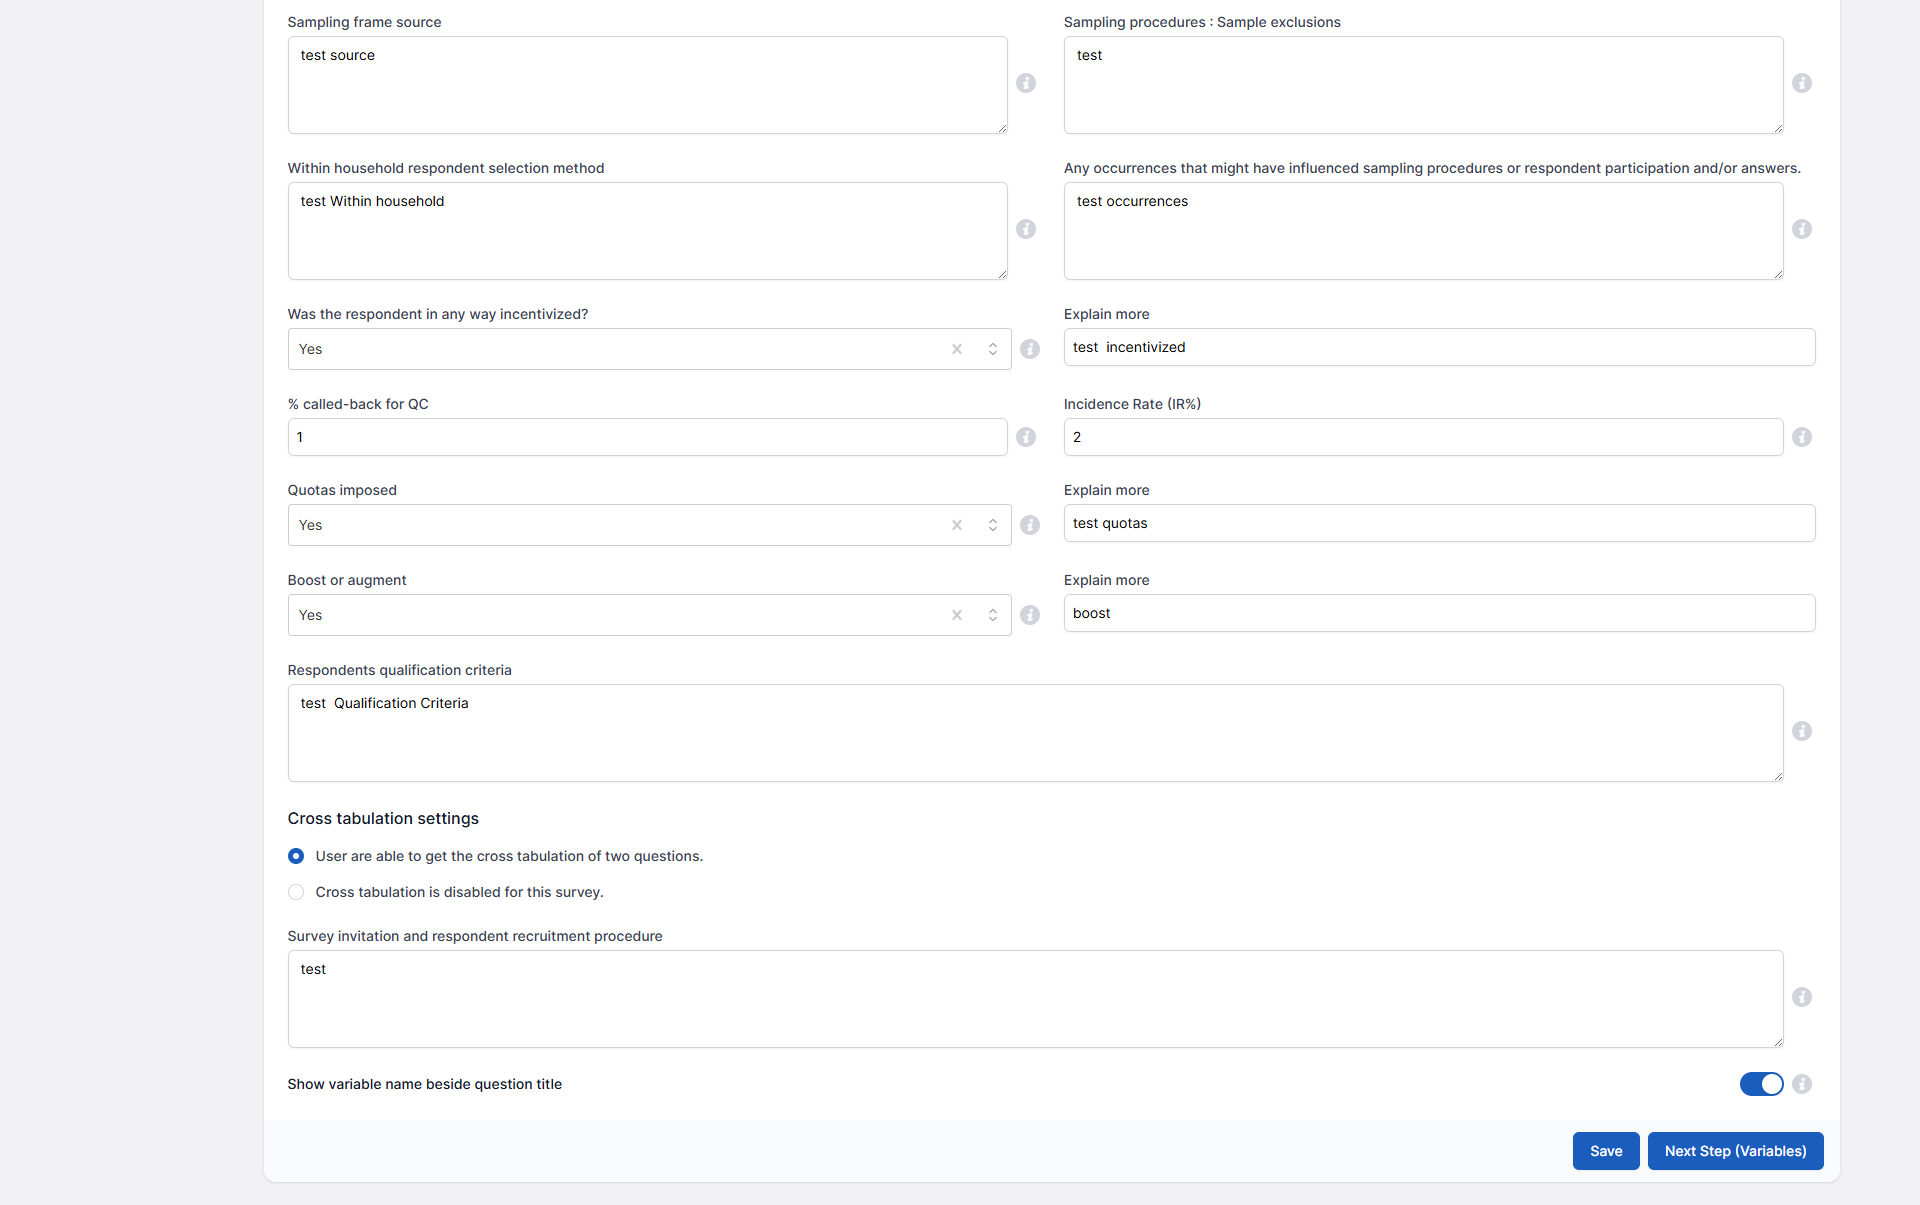 This section allows you to provide general information about the survey and your data expertise. Completing your **Data Profile** helps in:
* Informing users about your expertise and interests.
* Matching you with the most relevant datasets.
* Enabling users to find, follow, or express interest in your data.
* Enhancing visibility if you decide to sell your data on VoxDash.
#### **Required Fields**
* **Sample Size:** If an SPSS file is uploaded, this field is auto-completed you must enter the number manually.
* **Margin of Error (MOE):** Calculated based on:
* **Confidence Level** (default: 95%).
* **Proportion Percentage** (default: 50%). You can adjust these values to fit your research needs.
* **For Probability Samples:** VoxDash calculates and displays the MOE.
* **For Non-Probability Samples:** A "Comparable Margin of Error" is calculated with an explanatory note.
* **Sampling Method:** Choose between:
* **Probability Sampling:** Includes random, systematic, stratified, and cluster sampling.
* **Non-Probability Sampling:** Based on non-random criteria (e.g., convenience or judgment sampling).
* **General Population:** Describe the target population represented in your survey.
* **Respondent Qualification Age:** Specify the minimum age for participation (default: 18 years).
* **Coverage:** Indicate the geographic scope of the survey (e.g., global, national, city-level).
* **Collection Date:** Match this with the date entered in the general data entry section.
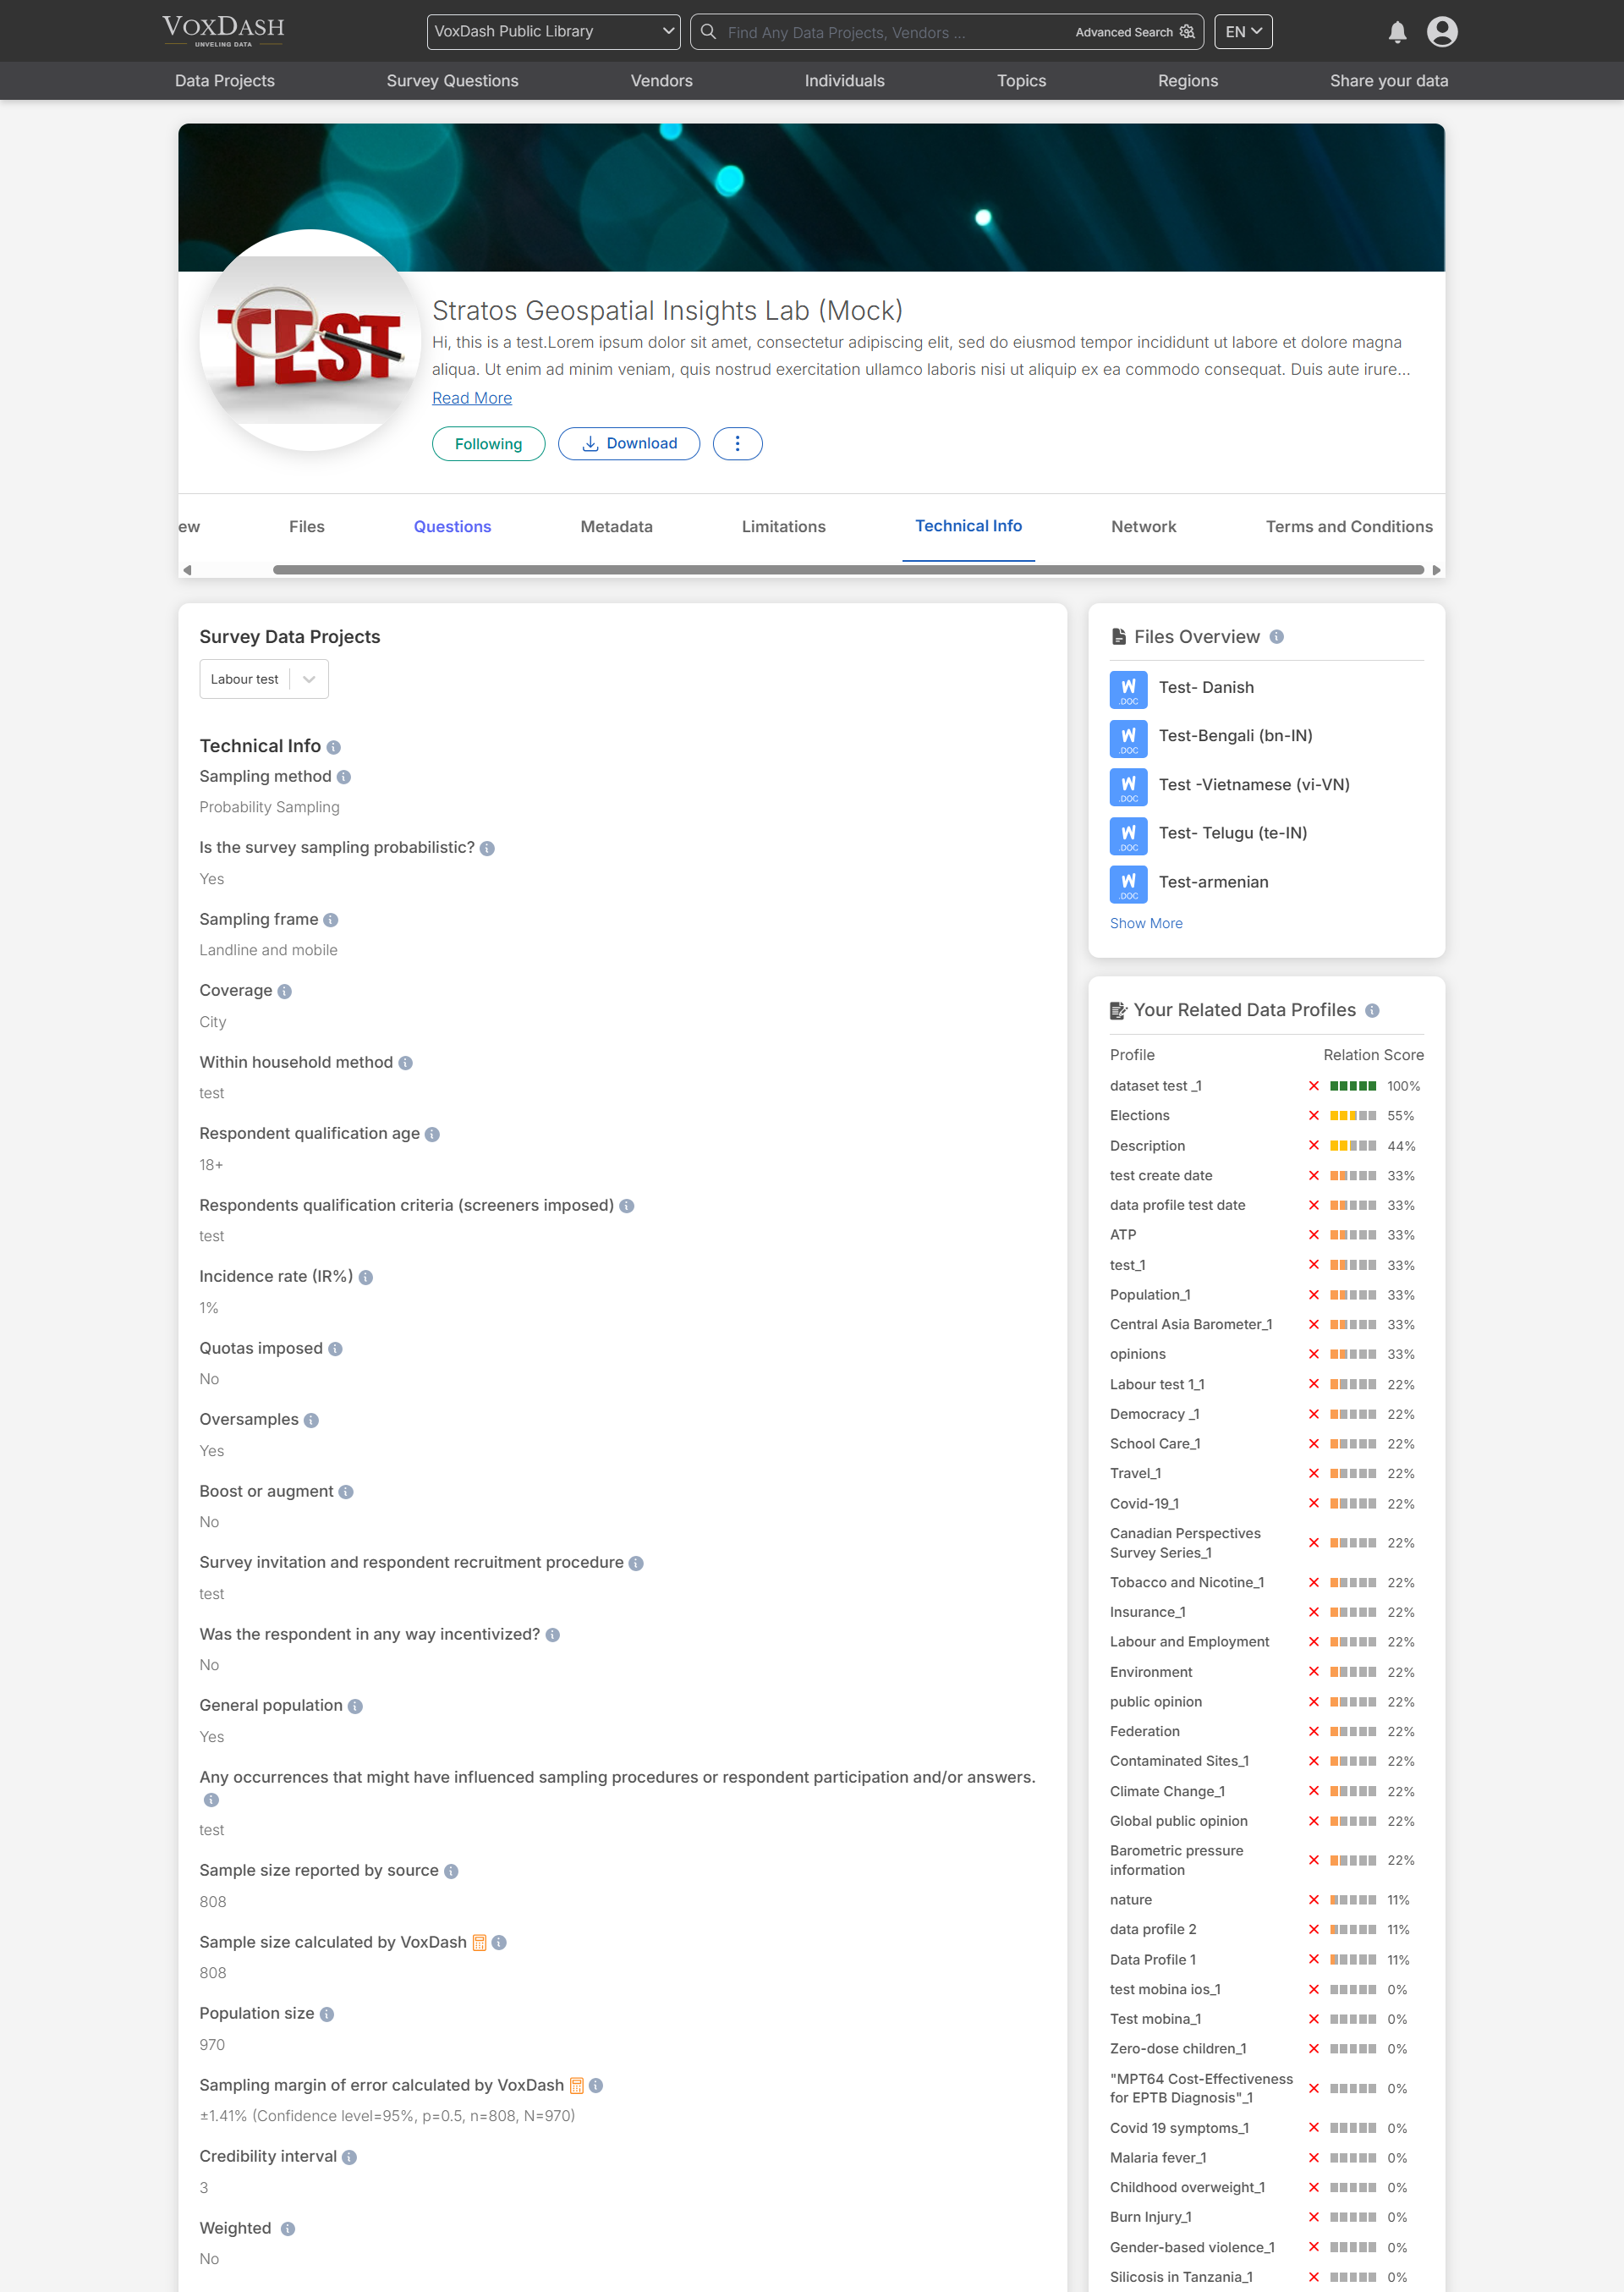
You can view the additional information by navigating to the **Survey Info Wizard** on the [Technical Info](https://www.voxdash.com/data/4408/technicalinfo) within VoxDash. This section provides a detailed overview of the newly added data, including key technical specifications, survey details, and any associated updates or metrics for better analysis and understanding.
This section allows you to provide general information about the survey and your data expertise. Completing your **Data Profile** helps in:
* Informing users about your expertise and interests.
* Matching you with the most relevant datasets.
* Enabling users to find, follow, or express interest in your data.
* Enhancing visibility if you decide to sell your data on VoxDash.
#### **Required Fields**
* **Sample Size:** If an SPSS file is uploaded, this field is auto-completed you must enter the number manually.
* **Margin of Error (MOE):** Calculated based on:
* **Confidence Level** (default: 95%).
* **Proportion Percentage** (default: 50%). You can adjust these values to fit your research needs.
* **For Probability Samples:** VoxDash calculates and displays the MOE.
* **For Non-Probability Samples:** A "Comparable Margin of Error" is calculated with an explanatory note.
* **Sampling Method:** Choose between:
* **Probability Sampling:** Includes random, systematic, stratified, and cluster sampling.
* **Non-Probability Sampling:** Based on non-random criteria (e.g., convenience or judgment sampling).
* **General Population:** Describe the target population represented in your survey.
* **Respondent Qualification Age:** Specify the minimum age for participation (default: 18 years).
* **Coverage:** Indicate the geographic scope of the survey (e.g., global, national, city-level).
* **Collection Date:** Match this with the date entered in the general data entry section.
You can view the additional information by navigating to the **Survey Info Wizard** on the [Technical Info](https://www.voxdash.com/data/4408/technicalinfo) within VoxDash. This section provides a detailed overview of the newly added data, including key technical specifications, survey details, and any associated updates or metrics for better analysis and understanding.
 ### 2. **Variables**
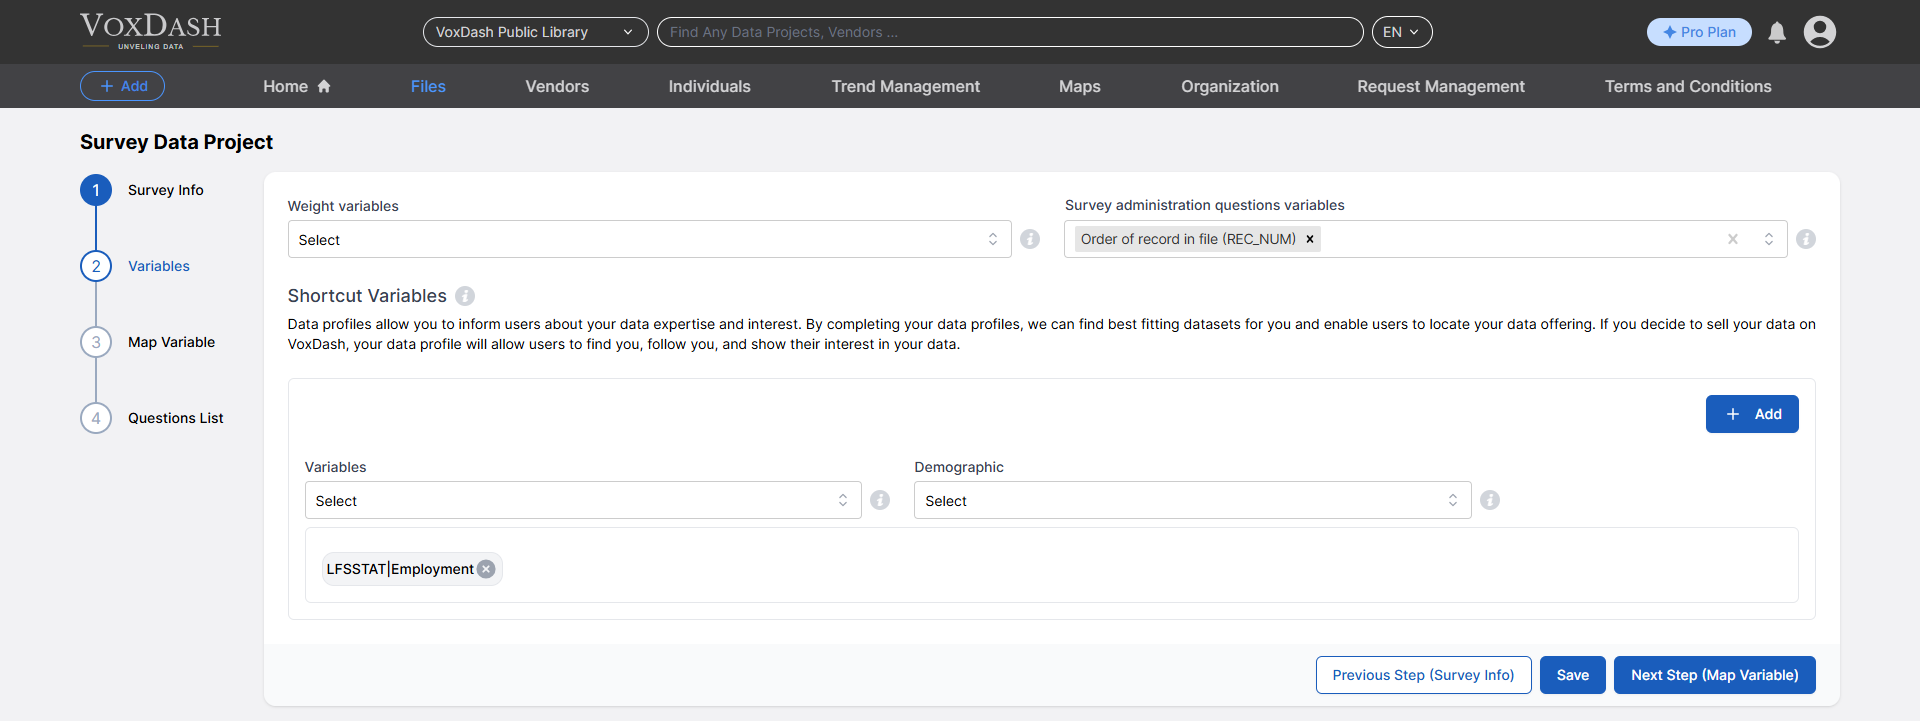 In the Variables section, you can:
* Add weight variables (if applicable).
* Exclude certain survey questions, such as:
* Questions with only one response option.
* Questions with no response options at all.
* Questions with too many distinct but unimpactful response options (e.g., "Weight" questions).
**Shortcut Tip**: You can prepare your survey SPSS file before uploading and add variables in your SPSS file to ease the process. Learn more [here](/Survey-&-Data-Entry/Working-with-SPSS-Files)
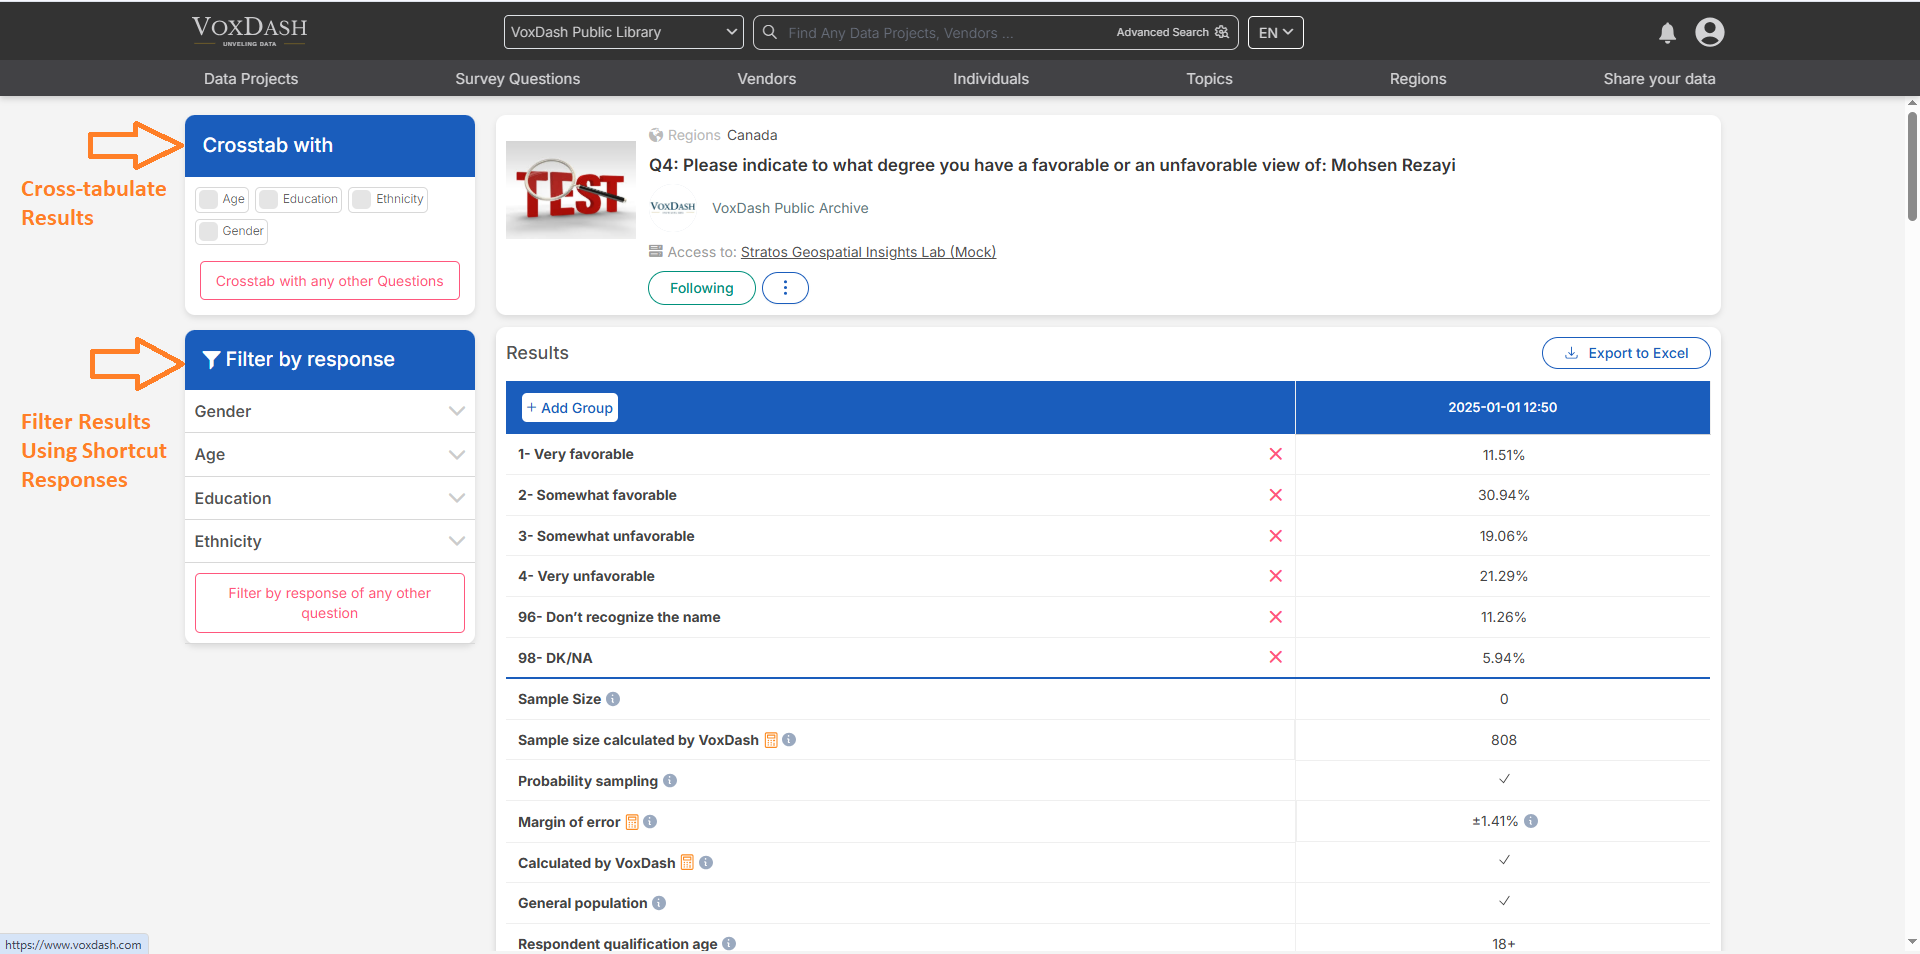
By clicking on any question, either from the **Data Project Page** [Questions Tab](https://www.voxdash.com/data/4408/questions) or the [Survey Questions List](https://www.voxdash.com/), you can access detailed VoxDash analysis for that question. This analysis allows you to:
1. **Cross-tabulate Results**: Compare and analyze the displayed results across different variables for deeper insights.
2. **Filter Results Using Shortcut Responses**: Quickly refine the results by applying predefined filters or response categories through shortcut options.
These tools provide a streamlined and interactive way to explore and interpret the survey data. Read more about [Weighted Variable](/docs/Survey-&-Data-Entry/Weighted-Variables)
In the Variables section, you can:
* Add weight variables (if applicable).
* Exclude certain survey questions, such as:
* Questions with only one response option.
* Questions with no response options at all.
* Questions with too many distinct but unimpactful response options (e.g., "Weight" questions).
**Shortcut Tip**: You can prepare your survey SPSS file before uploading and add variables in your SPSS file to ease the process. Learn more [here](/Survey-&-Data-Entry/Working-with-SPSS-Files)
By clicking on any question, either from the **Data Project Page** [Questions Tab](https://www.voxdash.com/data/4408/questions) or the [Survey Questions List](https://www.voxdash.com/), you can access detailed VoxDash analysis for that question. This analysis allows you to:
1. **Cross-tabulate Results**: Compare and analyze the displayed results across different variables for deeper insights.
2. **Filter Results Using Shortcut Responses**: Quickly refine the results by applying predefined filters or response categories through shortcut options.
These tools provide a streamlined and interactive way to explore and interpret the survey data. Read more about [Weighted Variable](/docs/Survey-&-Data-Entry/Weighted-Variables)
 ### 3. **Map Variables**
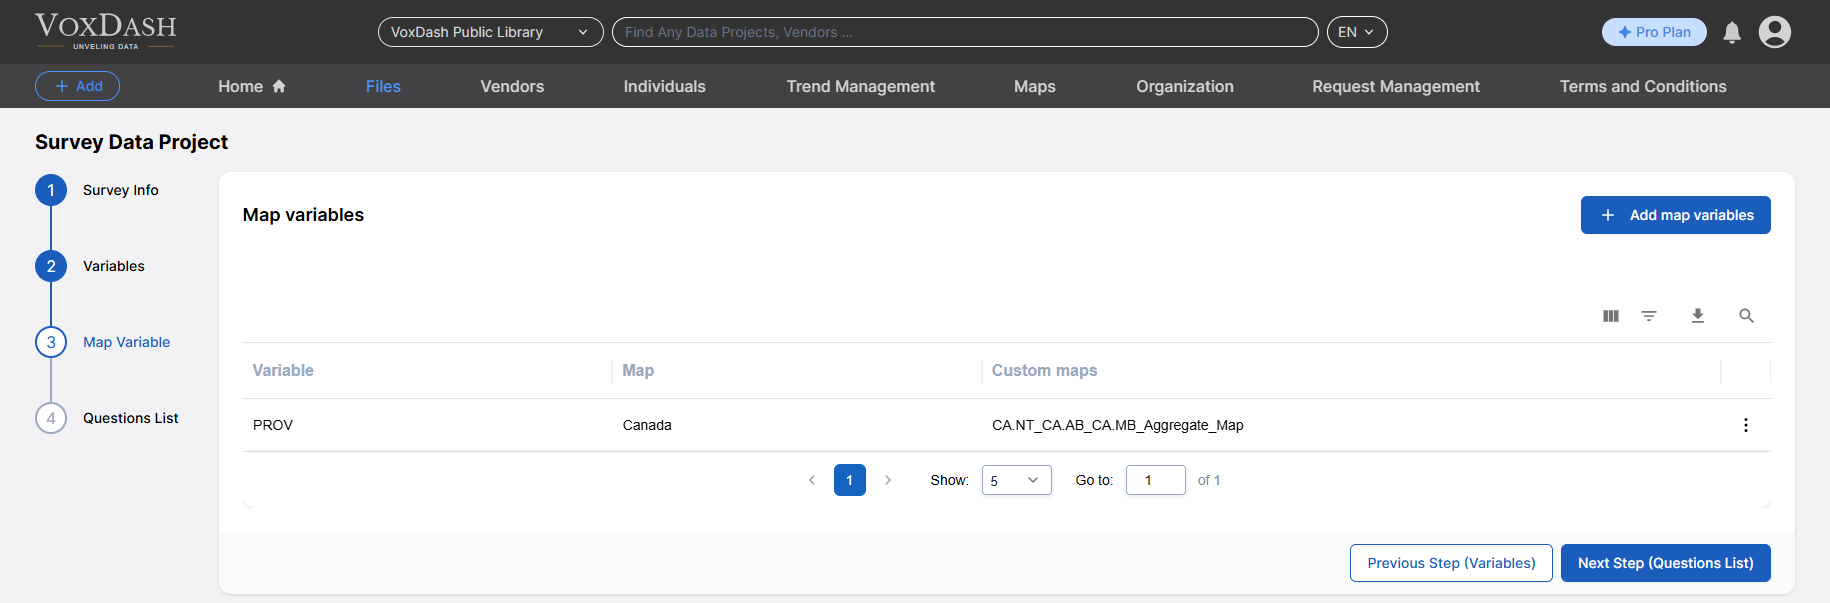 For surveys with geographical data (e.g., country or province):
* Click the **Add map variables** button in the top-right corner to add a map.
* Select the map variable and choose the corresponding map from VoxDash.
* Match region names if they are written as abbreviations by comparing them with the full region names in VoxDash.
* In cases of mismatched regions, manually re-match them in VoxDash.
* If a region includes options like "Don’t Know" or "Don’t Say," select **Don’t Map** in VoxDash.
* Click **Confirm** to upload the map.
Learn more about [Setting Up Maps for Survey Variables](/Survey-&-Data-Entry/Survey-Variable-Mapping)
For surveys with geographical data (e.g., country or province):
* Click the **Add map variables** button in the top-right corner to add a map.
* Select the map variable and choose the corresponding map from VoxDash.
* Match region names if they are written as abbreviations by comparing them with the full region names in VoxDash.
* In cases of mismatched regions, manually re-match them in VoxDash.
* If a region includes options like "Don’t Know" or "Don’t Say," select **Don’t Map** in VoxDash.
* Click **Confirm** to upload the map.
Learn more about [Setting Up Maps for Survey Variables](/Survey-&-Data-Entry/Survey-Variable-Mapping)
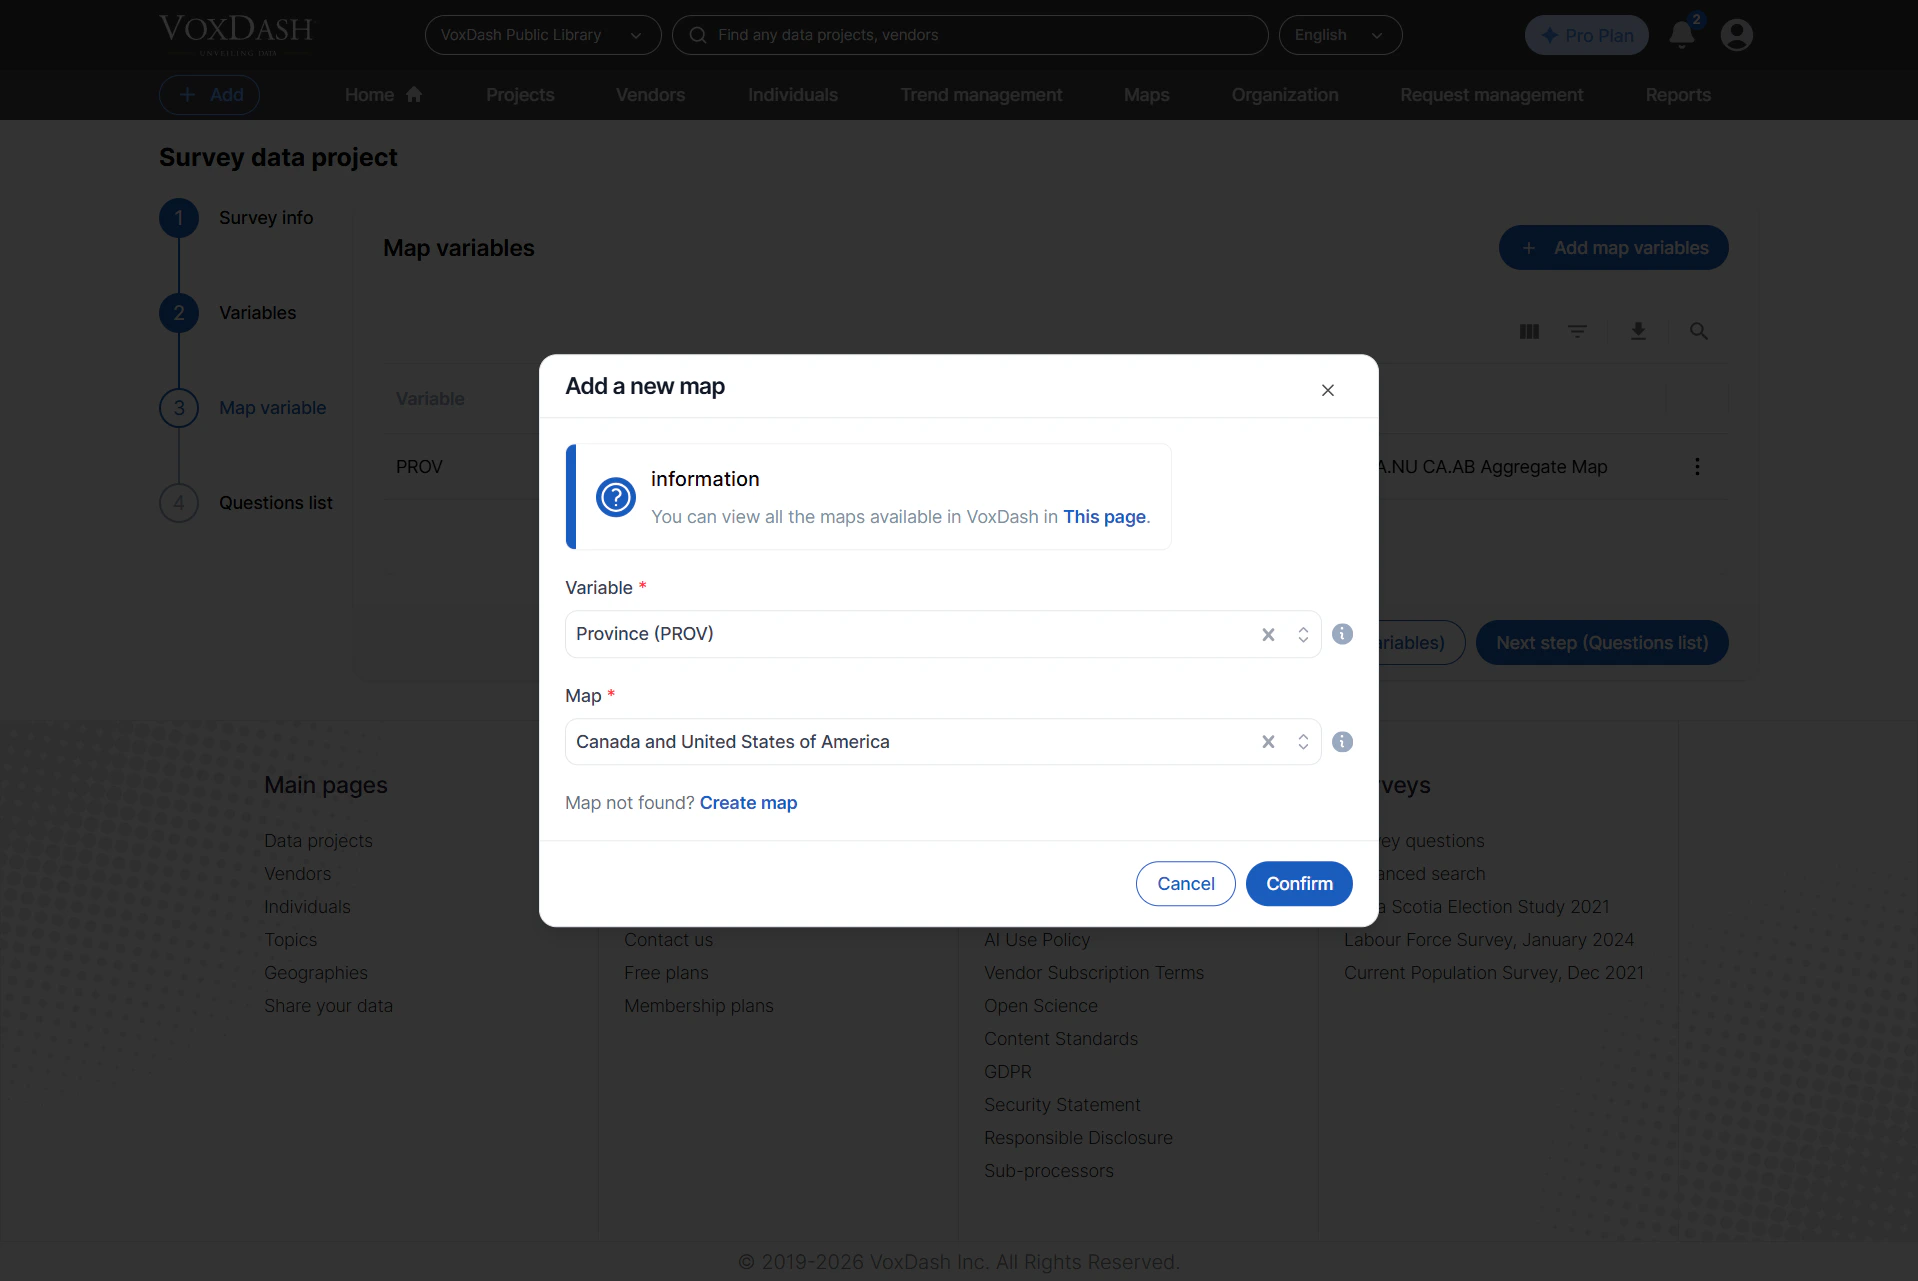
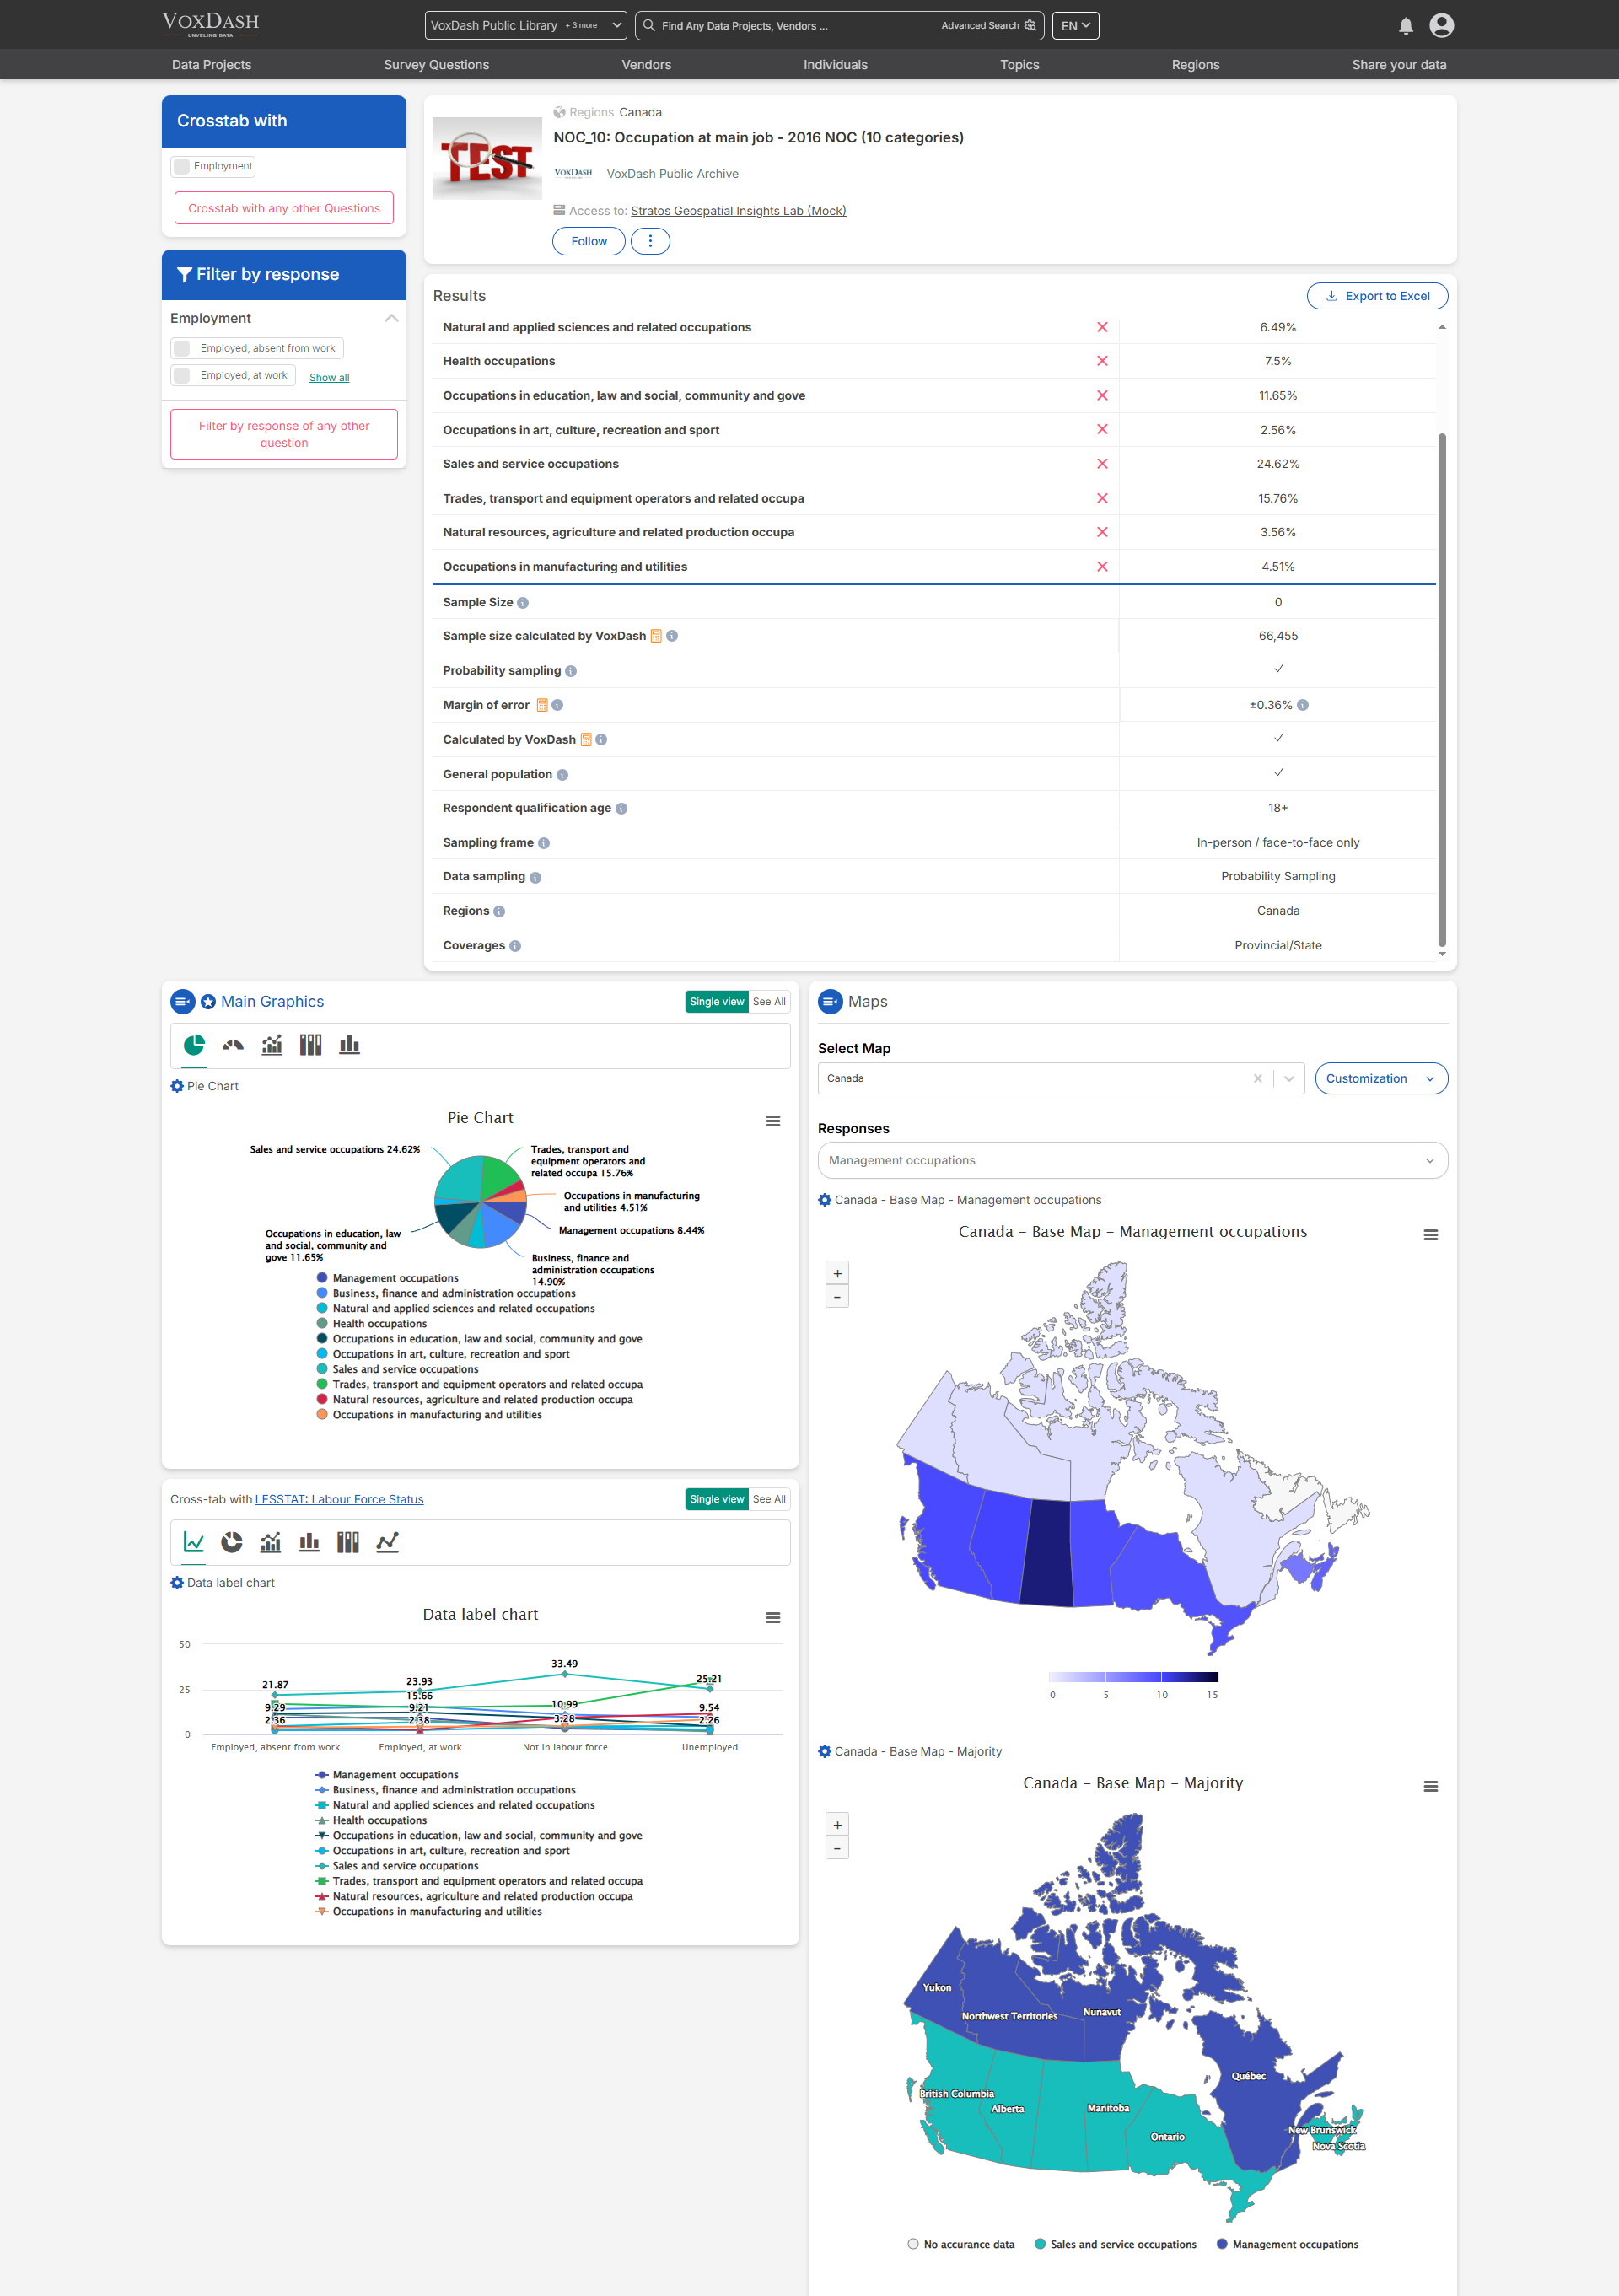
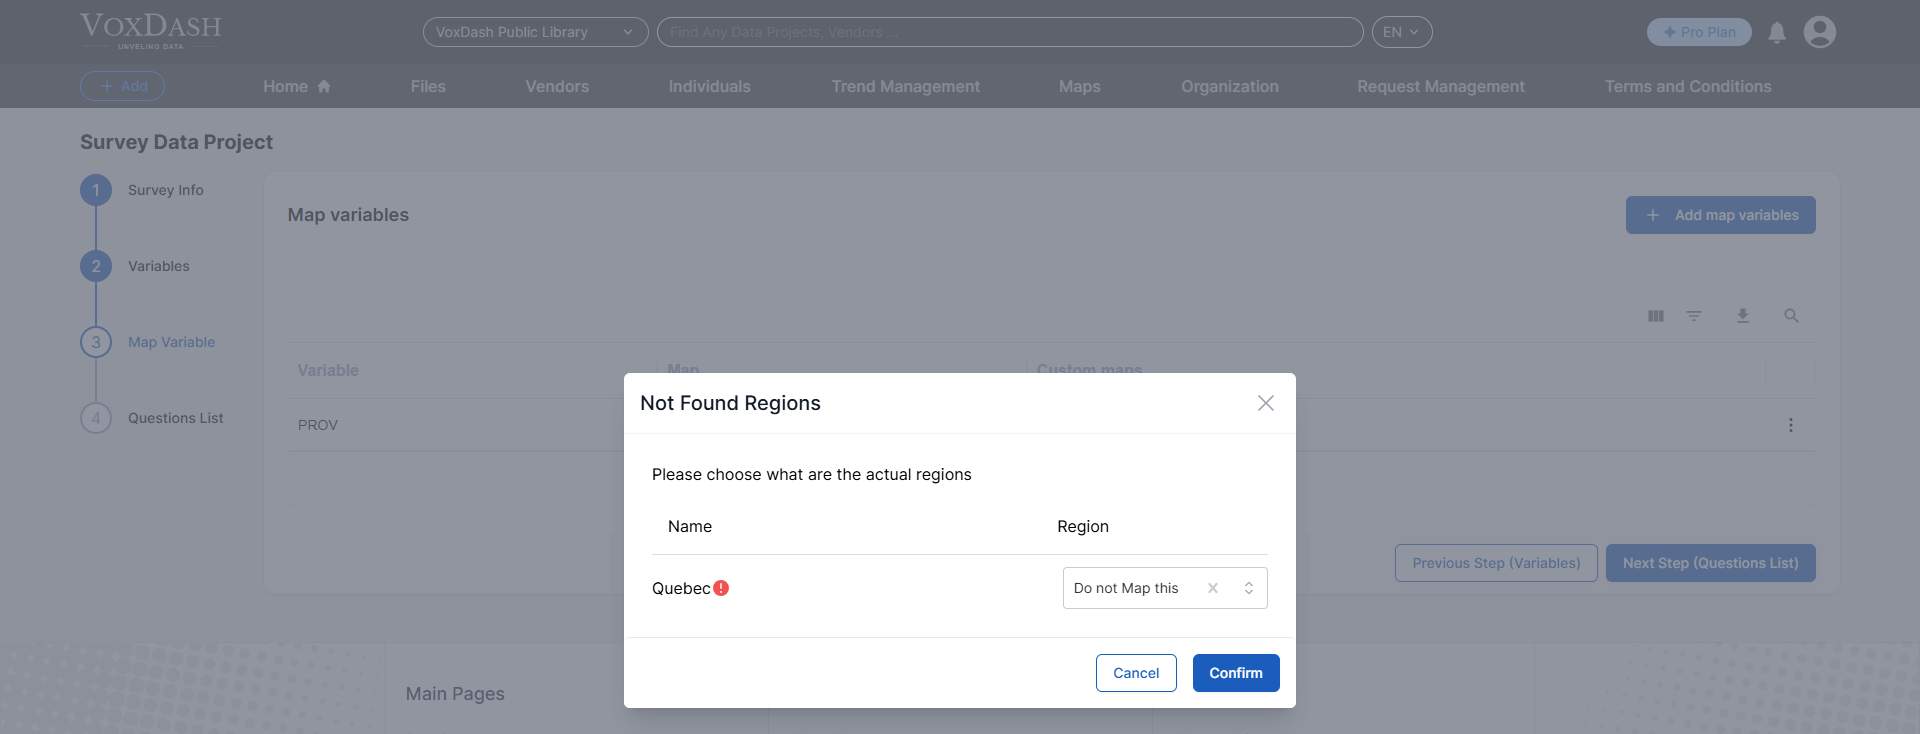 If a data project contains multiple map variables for different areas, such as states, provinces, regions and towns, users can follow the same steps to add multiple maps to the data.
All the maps will be shown on this page; users can choose one from the selection bar, or, if the map is supported, click the map to view the selected area. This map provides a visual representation of the data, enhancing the understanding and analysis of geographical or location-based variables associated with the project. All maps will be shown baron this page, and users can choose the map from the selection bar, or if the map is supported by VoxDash, users can click on the map and view the selected area.
If a data project contains multiple map variables for different areas, such as states, provinces, regions and towns, users can follow the same steps to add multiple maps to the data.
All the maps will be shown on this page; users can choose one from the selection bar, or, if the map is supported, click the map to view the selected area. This map provides a visual representation of the data, enhancing the understanding and analysis of geographical or location-based variables associated with the project. All maps will be shown baron this page, and users can choose the map from the selection bar, or if the map is supported by VoxDash, users can click on the map and view the selected area.
 ### 4. **Question List**
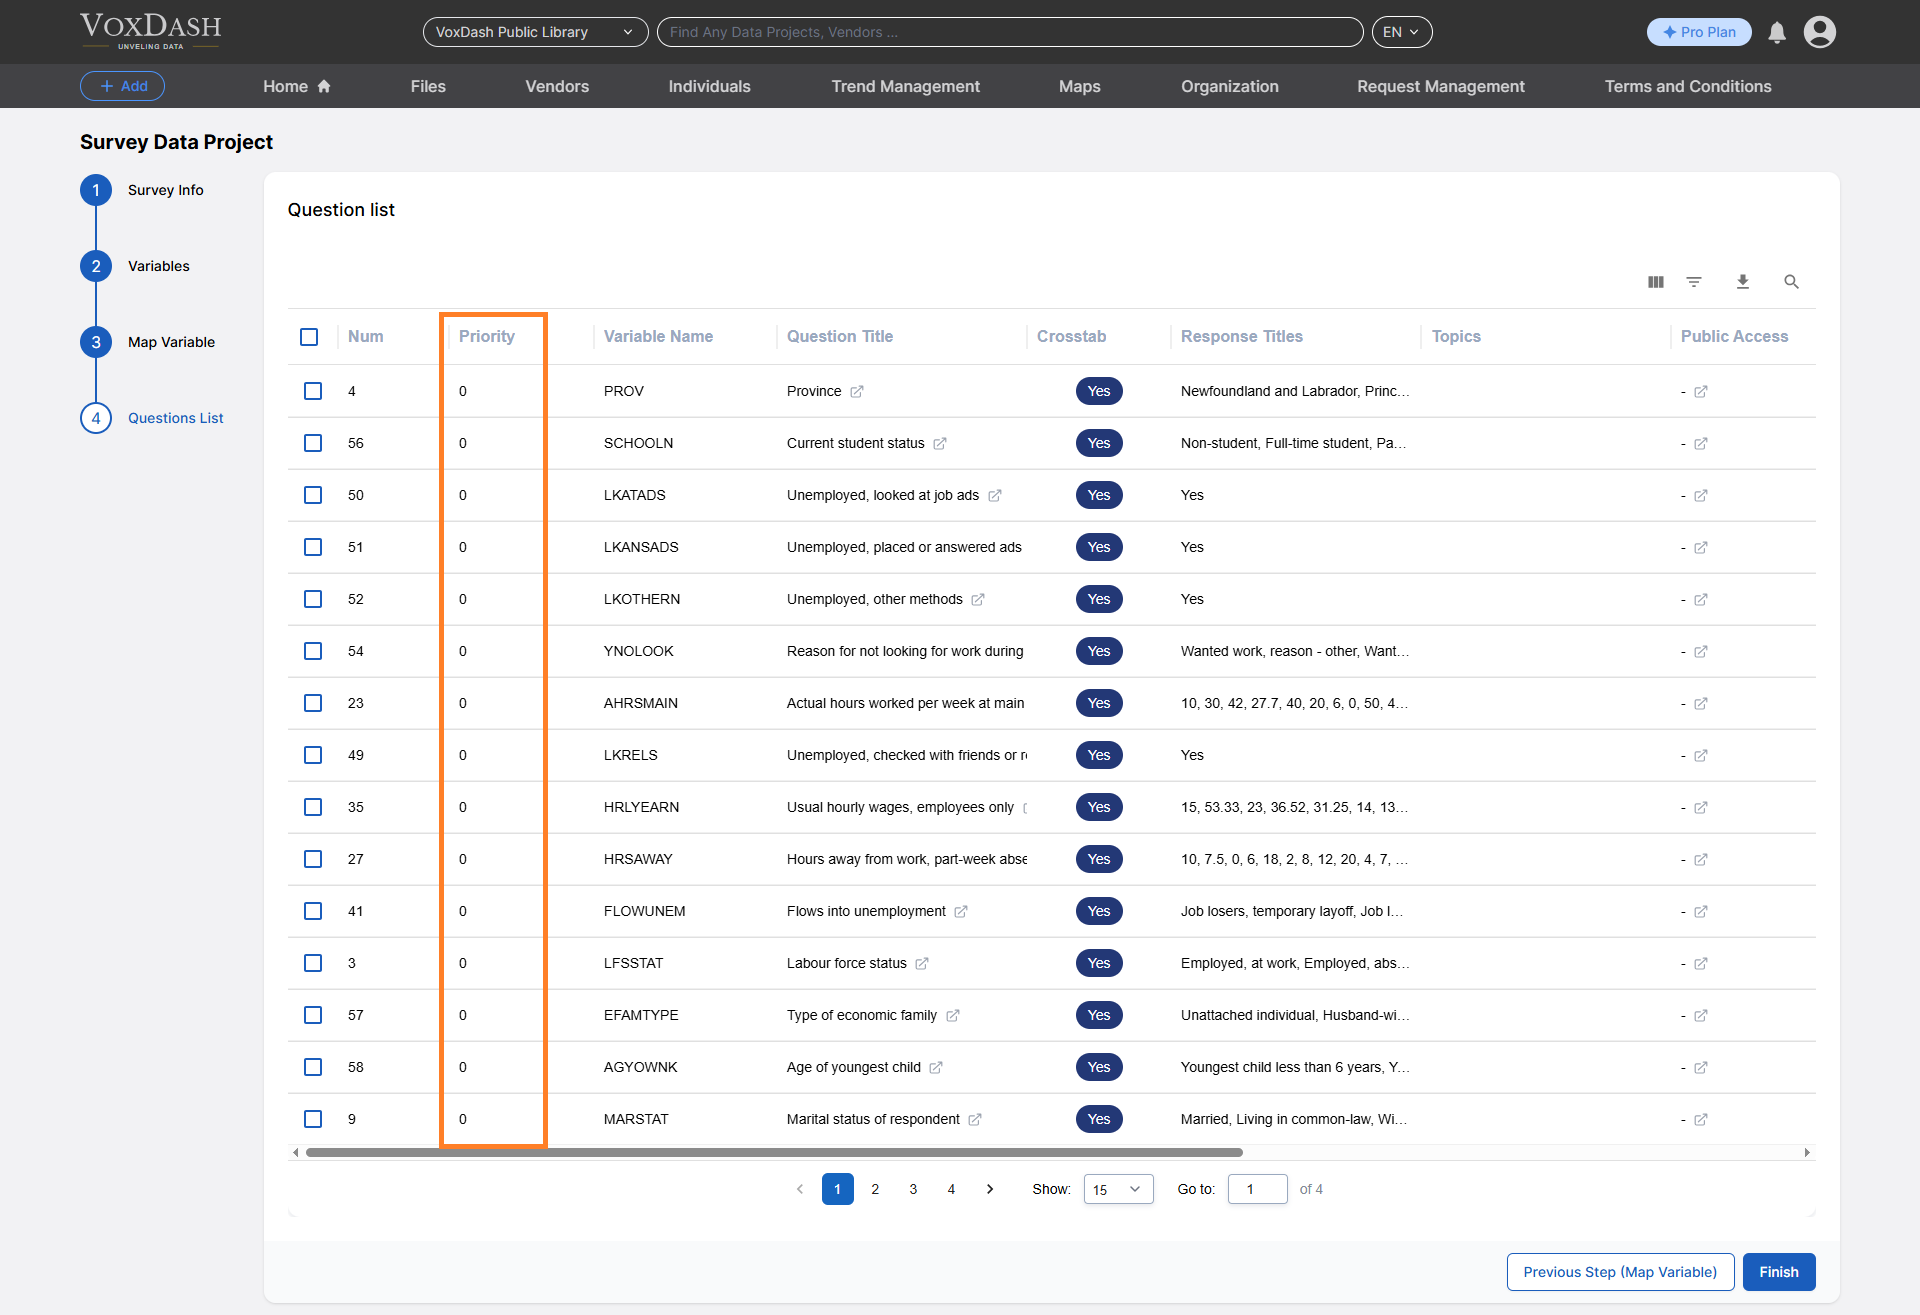 In this section, you can:
* Review the complete list of survey questions.
* Assign priority to questions so they appear on the main website sooner than others.
* Edit or delete questions.
* Give entity access
* Change the questions’ public access parameters
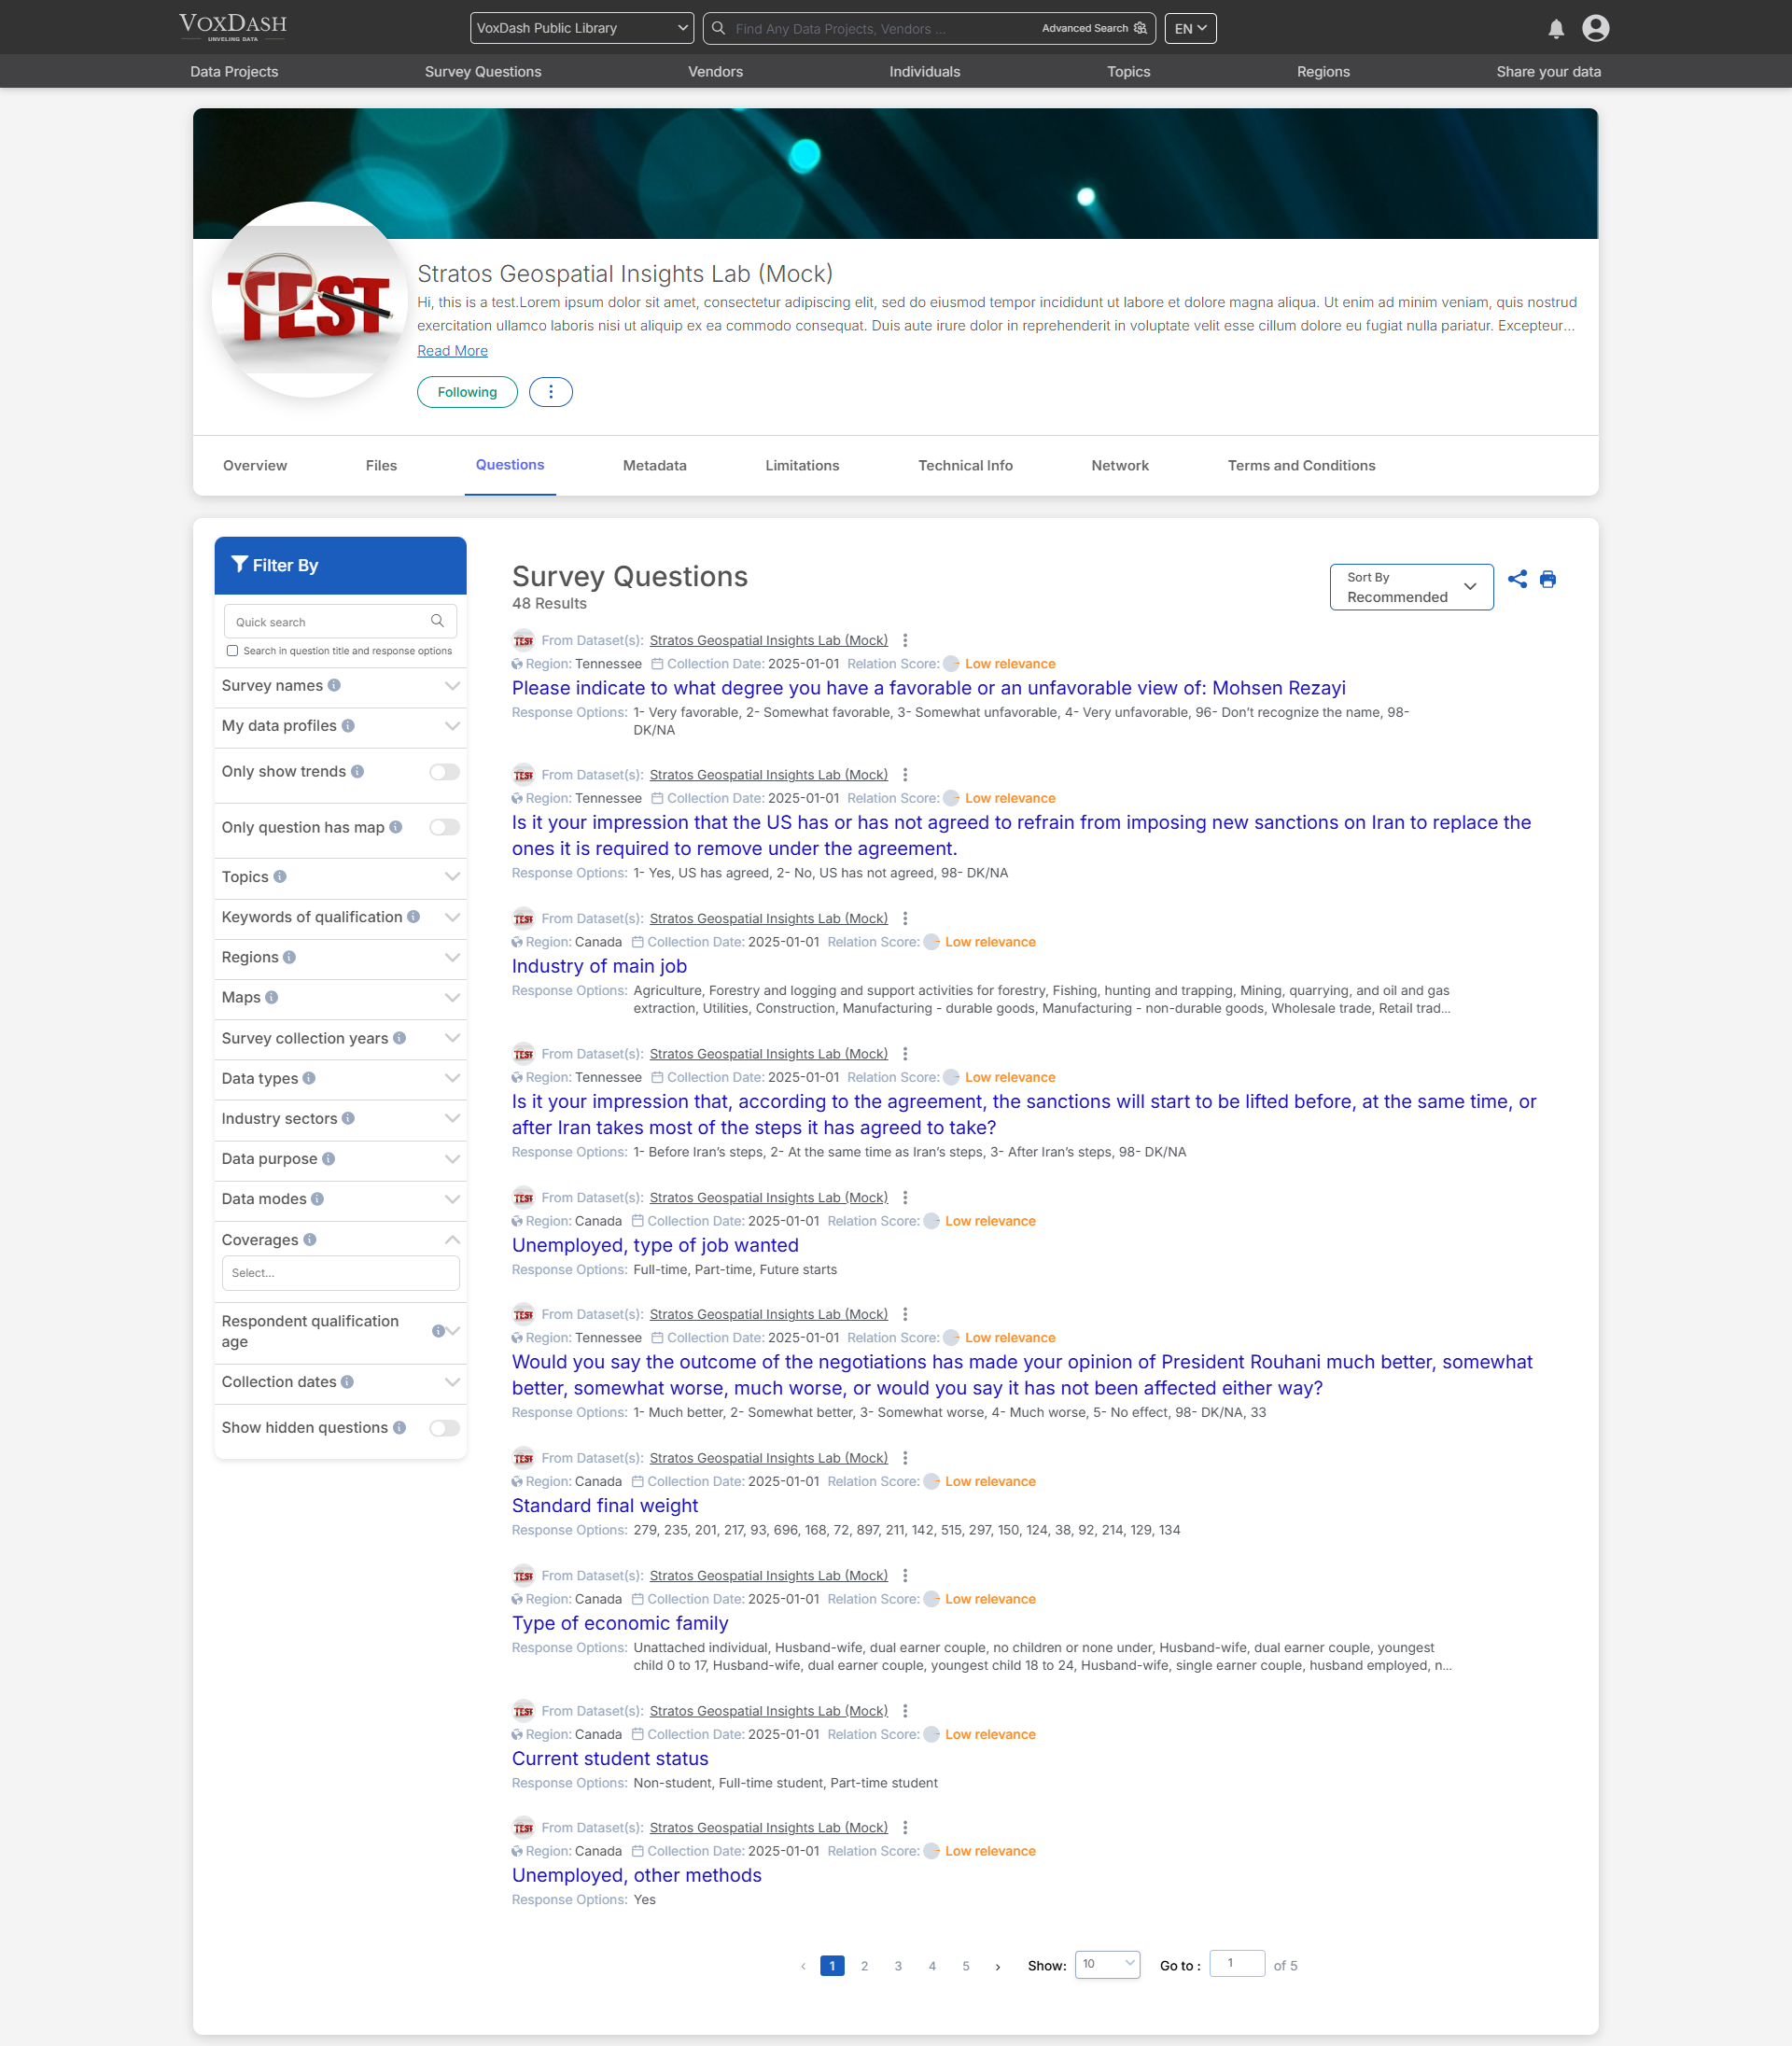
You can view the questions in [Questions Tab](https://www.voxdash.com/data/4408/questions) on each data projects page.
In this section, you can:
* Review the complete list of survey questions.
* Assign priority to questions so they appear on the main website sooner than others.
* Edit or delete questions.
* Give entity access
* Change the questions’ public access parameters
You can view the questions in [Questions Tab](https://www.voxdash.com/data/4408/questions) on each data projects page.
 Learn more about other fields [here](/Data-Entry-Fields/Survey-Data-Entry-Fields)
## **Summary of Steps**
1. Navigate to the project list and locate your desired project.
2. Open the data entry page by clicking the project name or searching for it.
3. Use the **Complete Data Entry** button to start entering general or Survey-specific details.
4. Follow the wizards to complete each section accurately:
* **Survey Info**
* **Variables**
* **Maps**
* **Questions List**
By following these steps, you will ensure that your Survey data is well-organized and ready for analysis or sharing on the platform.
Learn more about other fields [here](/Data-Entry-Fields/Survey-Data-Entry-Fields)
## **Summary of Steps**
1. Navigate to the project list and locate your desired project.
2. Open the data entry page by clicking the project name or searching for it.
3. Use the **Complete Data Entry** button to start entering general or Survey-specific details.
4. Follow the wizards to complete each section accurately:
* **Survey Info**
* **Variables**
* **Maps**
* **Questions List**
By following these steps, you will ensure that your Survey data is well-organized and ready for analysis or sharing on the platform.